Maine Central, Lamoille Valley

Maine Central, Lamoille Valley
Click image to link to my web site, nekrailroad.com

Monday, January 23, 2017

Recent work, and Springfield!

A quick update on some things I have been working on. But also, this weekend, the big train show up in Springfield, Massachusetts will be happening, and I'll be on hand again with my Woodstown Junction Free-mo modules, setting up a big layout with the New England Free-mo guys. Hope to see you there!

I was able to get the 2 new turnouts situated in Morrisville in order to add the new run around. Of course one of them had the points centered directly under a subroadbed support, but luckily it was as simple as removing a couple screws to get the support out off the way. I'm glad I followed hat advice about drilling up into the subroadbed from below instead of down from above. A few pieces of track reconnected everything, and a few new feeders, and I was able to successfully test it out running a train back and forth. No Tortoise machines yet - that will have to wait until after the Springfield weekend.

All track is back in place, and the siding to Lamoille Grain company is ready to receive a few loaded grain cars. Next up will be adding the Tortoise machines and doing some testing before paint, ballast and scenery repairs.
A while back, over on Trevor Marshall's Port Rowan blog, Trevor wrote about rebuilding his workshop and using some Ikea furniture to build things out. I have used a few different Ikea products, including my workbench and chair, a couple of racks for paint bottles, as well as a metal cabinet that stores lots of supplies. Trevor made mention of an Ike drawer system called "Alex" and how someone he knows uses it for extra car storage (Trevor went with some different cabinet choices). I've started to suffer from having completed and in progress cars and locos in various places around the layout room, so I decided to investigate this as a solution. It turns out to be a great solution, and I was lucky enough to get an after holiday 15% off sale price too. These would work well for lots of different things, like styrene sheet and strip stock, but I'm glad to have the one just for my various rolling stock and locos.

The unit provides 5 shallow drawers (the 2 lower are a little deeper) that work great for holding rolling stock and locomotives. I did not try to max out the space, but it would seem easy to hold upwards of 100 pieces or more of rolling stock.

The whole unit is on casters too making it easy to roll out and around if needed. This storage freed up a number of other areas around and under the layout and nicely centralized everything related to cars and locos not currently on the layout, but already out of their manufacturer boxes.
One of the drawbacks of the way my staging yard came out is the limited visibility for operators to see their trains when they enter or exit the yard. It is not overly complicated or a long distance to travel, but almost all operators prefer to visually see their train at all times if possible.

I've often thought a mirror would help operators get a visual on their train, just to see that they are moving and at what speed. Turns out we had another Ikea item in storage, purchased many years ago, a simple 9 inch square mirror. I played around with one to see if it would work. What I like is that it is not a giant mirror but just enough to see the yard ladder when you stand in the right place. I think the operators will appreciate this addition.

I made a simple triangular shelf and an angled support for the mirror. I used just one screw on the support so I could make some minor adjustments. After it was up, I decided to add a front trim piece to give a better appearance to the shelf. This mirror handles the Maine Central track into Portland bound staging (Portland, Bartlett).

A second mirror is up at the CP/BM end of the staging yard.  This one was built the same way.
This picture demonstrates how standing in the proper location will provide a nice view of the staging yard, making it easy to see trains on the move.
I've been slowly progressing on the ET & HK Ide building. I completed adding the embossed paper to represent the metal panels, and completed the loading dock, overhang, and windows and doors. Up top the windows are covered over. In front of them will be the unloading chutes up to the conveyor. Two holes in the roof were added so these can pass through. Still plenty more to do, but getting there.

I decided to place the in progress structure in its proper spot on the layout between work sessions. As I do not have the road underpass (which would be where the CP Rail switcher is, over to the V&O boxcar), this structure is more representative than prototypically accurate. Still I am trying to capture as much of the look and feel as possible.
One final project, I installed a Soundtraxx SoundCar into a BAR boxcar. I really wanted to get this done before Springfield so I could take it up there to try it out.

All the components are installed, including the SoundCar module on the roof (so it can be operated with a magnet), a Current Keeper module to prevent sound drop outs, and a spare Railmaster speaker I had on hand that doesn't seem likely to fin fit into any of my locomotives. 
Initial playing around was pretty neat. The consist via magnet works great. I adjusted a few volume settings, so I look forward to running this on trains through Woodstown Junction and out on the big Free-mo mainline this weekend.

Tuesday, January 17, 2017

Maine Central 564 - Good and Bad

I wrapped up the majority of the work on my 1970s version of Maine Central EMD GP7 #564. This unit was painted in a simplified green scheme used on a few locomotives starting in the late 1960s. It contrasts nicely with the harvest gold units that comprised the bulk of the MEC locomotive fleet of the day.

MEC 564 leads a short ballast extra through the White Mountains of New Hampshire in 1973. NERAIL photo by Jim Wright. 

Ted Houghton's image from rrpicturearchives.net provides a well lit side view of 564.
My model uses an Atlas GP7. I actually painted and decaled it (Microscale) a few years ago, but it has sat waiting for completion as other projects took priority. I found a need to get another MEC loco on the layout, so I pulled this unit out for finishing.

Added details include the front hood mount bell, the side mounted air horn and a winterization hatch. There are a few other details I can add, including a speed recorder and the correct MU stands, bt not having these on hand, they will have to wait.

The Microscale set is not the best representation of this paint scheme however, as it is a little too yellowish, and it also lacks the ring around the Pine Tree herald.

MEC 564 idles in St. Johnsbury

One thing that stands out nice on this unit is the Harvest Gold painted pilots.

I used mainly powders for weathering providing a good covering of rust, dust and soot.
However, not all was good unfortunately. I previously posted a picture of this unit showing the iPhone 4 speaker situated above the Tsunami decoder. The sound is great and after a little programming and adjusting the EQ, it sounds really nice.

That is until it stops making sound, or starts playing random horn sounds. Seems something is not right with the decoder. I tried a factory reset, and get the same results. It runs fine for a while, but sooner or later the sound cuts out, or the whole decoder cuts out and the loco stops. It is possible I damaged something doing the install, although this would be the first bad install after a couple dozen.

So it seems the remedy will be to carefully pop the shell back off and replace the decoder. It is ashame as I had it nicely speed matched with the Atlas factory-painted Harvest Gold GP7 565 shown above. As this was the last of the sound decoders I had on hand, the question now will be whether to go to Tsunami 2, to LokSound, as I would like to give them a try. Guess I'll have something to pick up next weekend at the Springfield show!


Monday, January 09, 2017

Morrisville Turnout Work

As I mentioned in an earlier post, I am adding a turnout in Morrisville at the suggestion of my operating crew. It will provide a second (and longer) runaround/passing track, as well as give access to the south side of the mainline from the eastern approach. In watching operations and trying some moves my self, I agreed the suggestion had merit.

My main concern with making this change though was how long would this take to get completed, and how long until I could schedule the next Op Session? One thing was certain though, nothing would get done unless I actually started the work!

With the required curved turnout in hand, I found I had a little time to get started with this the other night. I knew I would not finish this up in one session, but it seemed best to get started and chip away at the overall work.

I cut the rail with a Dremel tool, then pulled up the flex track. I cleaned up the surface of the Homasote roadbed. As there was no good subroadbed under the area that the new turnout would lead to, I cut out a section of scenery. This was only a piece of foam with some scenic material on top, so it wasn't too tough to remove.

Track on the LVRC mainline as well as the parallel grain siding has been removed, and a new hole  opened up to add subroadbed. Luckily a cross piece was right under this are to help support new subroadbed.
Using a scrap of 3/4" plywood, I traced out a subroadbed piece using the newly opened up hole. I clamped a support up from the cross piece below, and then leveled out the new piece. On the yard side, I had a small piece of support for the existing roadbed to tie into.

With a solid base I can now add sections of Homa-bed (2 pieces here were used to make sure the height was correct). this will support the new track off the curved turnout, as well as the track going back in for the grain elevator.
This took about 1 hour to get done, but was a crucial first step. Next time I can drop in the Homa-bed and get the turnout locations situated. Holes will be drilled for the Tortoise switch machines and I can cut new flex track pieces to tie it all together. After soldering the rail in and adding the track power feeder wires, I'll have done enough to support testing trains and restoring operations. This will be without turnout controls of course. Another session to get the Tortoise machines installed, wired and a control throw installed, and I'll be ready to schedule the next Op session. I wait until after a trial run with the next Op Session before starting repairs to the scenery.

I think the takeaway form this is to break down work that might seem daunting and time consuming into smaller sub projects that can be accomplished in smaller segments of time. It was unlikely I would find the multiple consecutive hours do this work completely in one shot. But tackling it in 3-4 sessions was very do-able.

Monday, January 02, 2017

Groveton NH Video

Happy New Year! Thanks to all those who take the time to check out my blog and see the latest on my layout. I enjoy putting information and pictures up here, and I hope it is useful and entertaining for most!

A week ago I used my iPhone to capture a few video clips of train action in Groveton NH. It doesn't encompass the full scope of operations that train 4301 performs, but I thought it would be neat to see some of the action up close as well as see the overall area and how it has progressed to date. I think it turned out to be a neat little operation within the overall scope of the layout.

While heading up to Boston on the Acela, I had fun editing the video and also adding some audio over top the video action. Using some audio clips from various sources as well as some of my own railfan video, I merged together a finished video which I think is more fun than just plain video. The Kato RS2, custom painted for BM #1501, does not have sound of its own at this point.

The video is up on YouTube, and you can view it below. If for some reason you can't see or play it, here is a direct link: https://youtu.be/MOeA7pdvf3Q

I would suggest viewing it larger than the small window below however. There is a Full Screen button at the lower right of the video.

I hope you enjoy!


Friday, December 30, 2016

Listening to my operators

Through the 5 operating sessions I have held so far I have received some good feedback on the layout and the operations. Some suggestions have been easy to address, like train sequence, which I have done through schedule changes in each subsequent session. Others have been more "infrastructure" related, involving track. Sometimes this has been addressed by explaining something about the layout and the prototype operation, and that has resolved the issue (like running from Whitefield to Crawford Notch to use a passing siding).

However one suggestion has been mentioned a couple of times by different people, so I am thinking it may have merit. Interestingly enough it involves a location where I freelanced the track plan instead of following the prototype. The prototype usually gets it right, so this comes as no surprise.

In the Morrisville yard I provided a passing siding to assist in breaking down and building trains. It works, but it could be easier if the siding was longer and also if it was not one of the yard tracks. With a limited number of yard tracks, it becomes tough to tie up the mainline and the siding and still have room to move power onto and off trains and also maneuver the yard locomotive.

I have watched these operations and also did some test running after the last session to see how things work. My conclusion was that the suggestion to drop in a pair of turnouts to create a second passing siding would really help things.


The siding to Lamoille Grain parallels the main line (left). The turnout installed is the start of the yard ladder and also one end of the existing passing siding. As suggested, dropping turnouts as shown will allow a second, longer, passing siding on the other side of the main. 
Adding the curved turnout on the main will involve removing a piece if the ballasted main line and a little scenery, but that shouldn't be too difficult. I will need to do some roadbed transition as the siding height is 1/8" lower than the main. The regular turnout on the siding will be even easier, a simple drop in for a cut out track section.

All the turnouts in this area are controlled by ground throws mounted at the layout edge (see earlier post on this). However doing it the same way for these 2 would require some major work that would damage scenery. I think the better solution will be to use Tortoise switch machines. For one, it will not require ripping out and rebuilding some scenery. But also throwing one turnout really requires the other to also be thrown. This is easy to do having one control throw both machines. I'lll just have to determine the best place to add the control. It will be my only Tortoise not controlled by DCC or a Touch Toggle!

Of course, checking my supply of turnouts on hand (I still have to finish track in North Stratford and Lyndonville) reveals that I have a #7 curved turnout, right hand even, but what I really need is a #7.5 for the 28" inner radius curve. And I could use a #5 or #6 left hand turnout for the siding, and all I have are right hand turnouts. Figures! 

As the overhead shows, I need a less sharp curved turnout and a left hand (not right hand) turnout on the grain siding. Of course, I don't have these on hand!
So time to pick up the 2 turnouts I need and then see if I can get this installed without too much down time. I have the layout restaged and ready for another op session, so I'll have to see if I want to wait until this is done, or have the op session first and then come back and do track work.

Tuesday, December 06, 2016

ET & HK Ide Building

I've started work on replacing the photo mock up stand in building for the ET & HK Ide building, a signature element of the St. Johnsbury yard scene. I constructed the mock up probably 12 years ago. At first glance it does a pretty good job, but of course lacks many of the 3 dimensional details that make it look better.

Photos printed and applied over a foam core base - 2004.

An early picture when St. Johnsbury was still being built and only some of the track in place - 2004.
I have since built the nearby coal shed and the Allen Lumber building. I'll need to also complete the Caldbeck-Cosgrove building to finalize the main structures for this area.

From an op session last year, at the top of the photo, the coal shed behind the red CP boxcar, the ET&HK Ide building, the Caldbeck mock up, and final the Allen Lumber shed building. Behind are freelanced buildings for an ice distributor and a propane dealer.
Using basic dimensions provided via the MEC Yahoo group many years ago, I built up the core using plain styrene, and applied Evergreen styrene metal roofing. I built up the unique trim pieces using dimensional styrene as well as cut sections from sheet for the really wide trim. I am not building an exact replica as the building was deeper than I have space for. There is also a side extension that I am deciding if I want to include.

The unique siding material appears to be 4x8 sheets of embossed metal, giving it a brick like pattern, but clearly showing the individual panels. I found that a material produced by Laser Modeling 3 that replicates this. You can see it on their AR Gilmore Grain building here. The ET & HK Ide building does not have the pronounced overlap that the Gilmore kit displays, so I am not overlapping the pieces.

Here is an in progress picture:

Adding strips of the Laser Modeling 3 embossed panels. The top section appears to have a slightly different panel applied, although it is hard to tell for sure. I am just using V groove siding for that part as it seems to better capture the look of the prototype.
I'll post more pics as things progress. The next steps will be adding the loading dock, its roof and assorted doors. Painting the large block letters will also be a challenge, along with building the grain elevator chute and platform. The delivery tubes will use styrene tube already on hand. Overall I expect this will take a while, but it is good to get this structure started finally!

For reference, here are some pictures I took in 2002. You can also find many more online, and with trains actually in the pictures too! The building is still there and the yard looks a lot better now that the Vermont Railway has taken over operations of the line.

The coal shed is seen to the left of the ET & HK Ide building, and the spur track leads right into it. Up to the right is the corner of the Callback building and some add on buildings.

Trackside view. The dock roof has seen better days! To the left is the add-on section that I may include - I am reviewing different pictures to get a better idea how it looks.

This loading dock is right up to the track. I believe the elevator chutes led to below track level, although I have no pictures of that. These chutes were added later and are not in earlier photos. They were added right around my timeframe, so I will include them as they are a nice detail item.

The panel sections are evident in this shot, and the overlapping is not as pronounced as the Laser Modeling 3 kit, so I am butting the panels up to each other and not overlapping. I will pull a few seams out to match some of the wear seen on the prototype.
There is actually a historical web site for the ET & HK Ide building with some neat older photos. Check out http://etandhkide.com.

Friday, November 18, 2016

Small tasks

I have been doing a number of smaller tasks over the past few weeks. Just as important (sometimes more important) than the larger scenery or structure work, these are things that may not jump out for those visiting, but they help make the layout run better and look better.

After the last Op session, it was noted that 2 turnouts in St. Johnsbury were causing issues. One had a dead spot through the points and frog, and the other did not throw completely. I addressed these with a new feeder and a new throw bar. Small tasks, although it took a while to clear space under the yard to work, and then put everything back. I usually do not have to go under there.

The original throw bar rod was on the outside of the turnout, which worked, but over time was not as effective. A new hole was drilled one tie above the throwbar and a new wire bent and installed.
A simple bell crank method was employed to have the side to side throw of the Tortoise transferred to a twisting motion of the new throw rod. Thanks to Lionel Strang and the July 1997 issue of Model Railroader and a little foresight on my part, I had a photo copy of the article detailing this method right with my Tortoise supply should the need ever arise - now it did!

 I originally addressed the dead section of the other turnout using the Tortoise contacts. But I found that I was getting a short circuit as the machine threw. Seems the contacts would switch power before the point left one of the stock rails. I am sure there is a way around this, but I went the simple route and installed a Tam Valley Frog Juicer I had on hand.

I had purchased a number of Frog Juicers a few years back on a Black Friday special pricing sale. However this is the first I have needed to actually install to address a problem. I only have a few of these older "less than DCC friendly" turnouts where the points, closure rails and frog rely solely on contact at the points. 

I took the time while I was under there to solder feeder wires to each turnout in the yard should I need to address getting power to a dead point, closure rail and frog in the future on these older style turnouts. But I'm not going to invest in the time and cost of adding Frog Juicers unless (or until!) a problem arises.

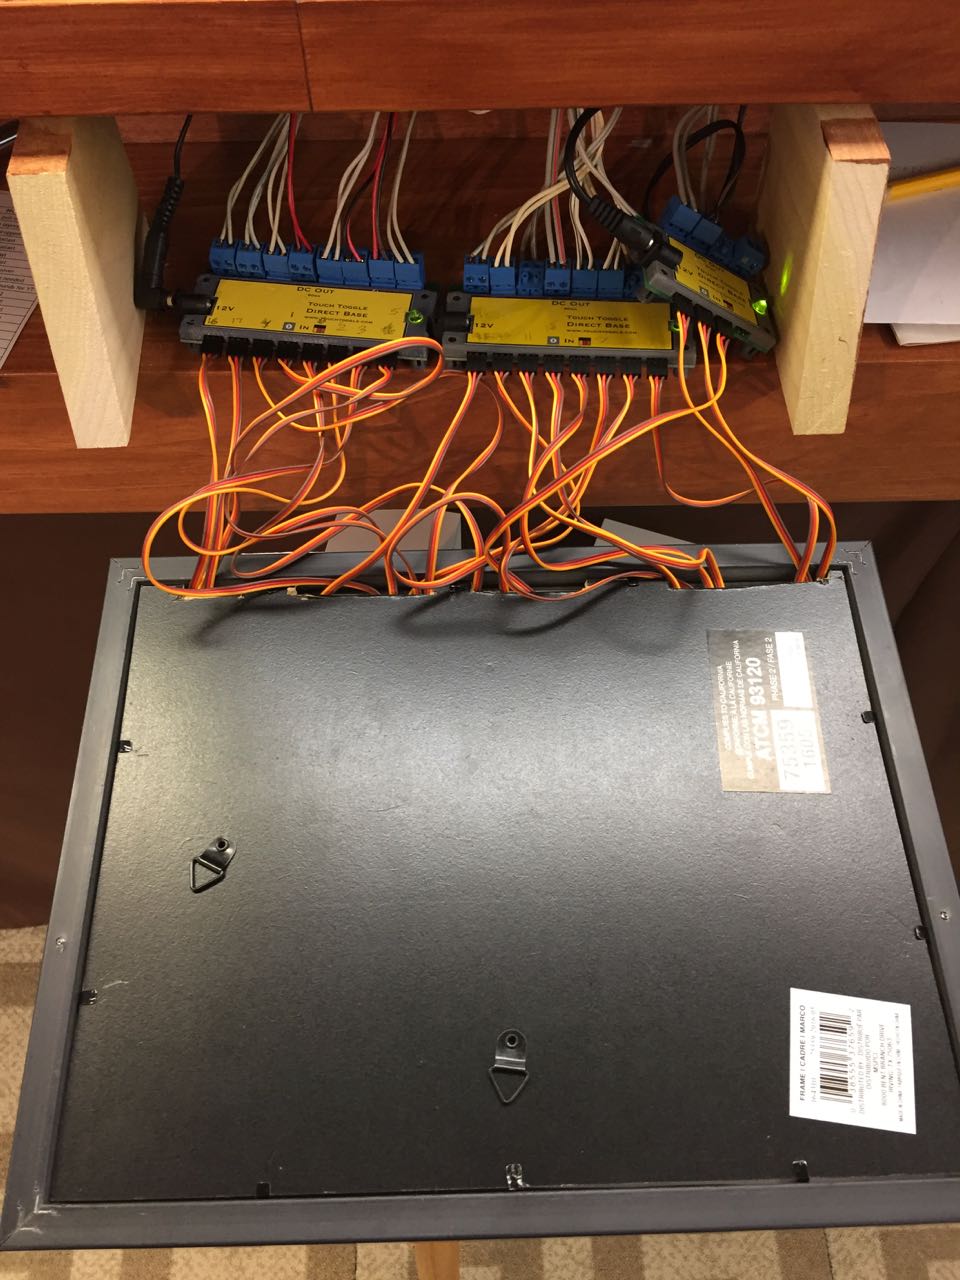
I also addressed an issue with the Touch Toggle panel for St. Johnsbury yard. The frame I originally used had a cardboard back to press the toggles and paper schematic up agains the glass. Due to humidity this tended to not press tightly in the center area of the panel and operators had to press it from behind to put it up against the glass in order to get it to respond to a finger on the glass.

I solved this by going to a new frame with a wooden back piece that keeps everything firmly in place and tight to the glass. I also decided to screw it in place instead of velcro for a more stable panel.

The back of the new frame is a sturdy piece of hardboard to keep everything tight to the glass. All the wires from the individual toggles exit out the bottom where I cut notches to allow them to escape without pushing the back away from the frame.
The new panel installed with stainless steel screws. Works great! It is interesting to simply build a panel like this up in the kitchen and then just bring it down, plug it into the board and be done. A really nice solution.

I had previously nearly completed the ball signal and shack using the BEST trains kit, however I never did put a roof on the shack, so I completed that. I used sand paper and painted and weathered it as it better represents the look of the prototype in pictures around 1980.

Need some dirt, weeds and gravel so it doesn't look like a recent snowfall has occurred!
The rest of that BEST kit includes the car shed and office for the Maine Central in Whitefield. My wife started this kit a while back, and finished it up by adding the roof shingles and gluing the 3 completed separate sections she completed together into 1 structure. We did not notice at the time, but the 2 side walls of the main building were reversed, so I will end up with the shed being reversed from the prototype, but I doubt anyone will notice. If you think about the side door being used to store a track speeder, you can see the issue and why the office door should be on the opposite end!

The door on this end should really be on the other end facing to the East, with that attached shed on this end. No big deal, I think my wife did a pretty good job otherwise! Need to add a little scenery around here so it looks better.

When I was laying out the MEC track into Whitefield I included a turnout for a siding to a local industry. Sometime later I glued down some wood ties figuring I would hand lay the rails for the siding. I have not really hand laid any track on this layout, and have not done so since an earlier layout that was going to be all hand laid. I can tell you at this point I much prefer flex track and think it looks better when properly weathered. But it was fun going a little old school for this siding. Much harder to see those spikes these days however!

The new siding with hand laid code 70 track. Just need to fill in a couple missing ties by the turnout. Took about 30 minutes to get this in versus probably less than 5 minutes to lay down a piece of flex track.

The new siding is ready for operations. This will be Whitefield Plastics, which did exist but did not actually have rail service. I waybilled this Allegheny Midland covered hopper to haul in plastic pellets. I chose the AM car because it was Tony Koester who first exposed me to hand laying track with accounts of his AM layout in RMC back in the late 1970s when I was getting my start in the hobby. Seemed appropriate.

The prototype Whitefield office had a large pine tree logo on a metal panel affixed above the doorway. I thought this was a cool detail so using some MEC decals I prepared some MEC signage to use on the layout. I painted thin styrene and applied the decals. These are ready to cut out and install now.
Not sure where I will use them all, but I'll find someplace for them. The decals were from a Microscale caboose set that I probably will not need to use, although there are plenty left to do at least one caboose.

I started the process of building an Eastern White Pine tree as described by Mike Confalone. The trunk is a dowel with lots of holes drilled in it and then pieces of leafless cassia inserted and glued. Then the whole thing is painted with brown camo paint. Next steps involve spraying hair spray to the caspia and sprinkling green static grass to represent the needles. This is the first attempt, not sure if I have enough branches or not. But it is time consuming! For a good look at these completed, check out Ryan Mendall's post on Eastern White Pines on his excellent Algonquin Railway blog.

Looks like the Christmas Tree on top of the car in that commercial where they 2 cars race and blow off all the needles! Hopefully my next post on these trees will look more like a pine tree.

A while back I posted a picture of the roof of the FOS Scale Liqour store kit I was building. I finished up work on that by completing and installing the sign. I'm not sure I have a specific space for this on the layout, and it is a bit more modern due to the included signage (i.e. beer prices and logos not right for 1980), so I think this will go to the Free-mo module.

This was a fun kit to build and the interior pictures and other details making it come alive nicely.

I also quickly put together a Bar Mills Basics kit I had on the shelf. I was looking for something to do while watching some hockey on TV, and this simple kit easily fit the bill. The whole thing is easily assembled in one evening, producing 2 cool little buildings for the layout. I painted the structure gray first, then did a dry brushing of the red over top to give the effect of paint that has peeled and fallen off.

These will be useful to drop in on the layout. I figure one will serve well as the gate building for Hardwick Gravel, located next to a truck scale.

Finally, while shopping in IKEA I saw these neat little carts on wheels for $30. They are very sturdy and have pretty nice casters on them. I decided to buy a pair and use them for scenery material. It will be easier to roll these out then hand grabbing stuff off the shelves under the layout where it normally resides.

These come in white and black, but I really liked this orange color. Seems to match the room and fall layout colors better. I think I will be buying  a few more of these.

These small tasks activities, along with restaging the layout for the next Op Session (as well as changing some things in the Ops plan), plus general clean up for the open house, have kept me busy.

Next up is the open house (hopefully I'll remember to take some pics) and then I plan to finally start building the ET & HK Ice building and replace the stand-in photo mockup.

Sunday, November 13, 2016

Updating Old Web Site

Most of my online postings have been here on this blog, as well as some posts on my Facebook group (Northeast Kingdom Model Railroad), as well as a few posts to the railroad-line.com forum. Preceding all of this activity was the web site I created over 12 years ago, nekrailroad.com. I put a lot of my research information on that site and continued to update it and add information over the following few years.

With the ease of use of this blog as well as the discontinuance of the software I used to maintain the website, nekrailroad.com has been pretty dormant the past 3-5years. I maintain some other web sites, and acquired new software about 2 years ago to easily maintain these web sites. However there was n real easy way to import the old sites. This wasn't a problem for the other sites which were relatively small. It was an easy matter of just building them from the ground up with similar, yet updated, content. The nekrailroad site though was more work, so I just put that on the back burner.

I've decided to put a few hours into updating the site by bringing it over to the new web site software. That work is now in progress, and I have started the update to nekrailroad.com:


The overall look and content will be similar to the old site, but I will be able to update it more easily now, and fill in some new or missing areas. It will better document the layout and be easier to get to a specific topic, and more easily get to research info I have documented.

This will be an ongoing process, so not everything is done yet. The content from the old site will move over a period of time, so I am providing a link to the full content of the old site, as noted on the first page. This can be accessed via nekrailroad.com/NEKOLD/Welcome.html.

I'll still mainly post updates via this blog, but will probably copy a few things over to the nekrailroad website as well, such as finished work for example.

Wednesday, October 12, 2016

Annual Open House - Nov. 19th

This year the layout will be open in November for the annual Model Railroad Open House schedule for the NJ/PA/DE/MD area. Along with a number of other NJ area layouts, I will be open on Saturday November 19th from 12 noon to 5pm.

The schedule and website has a changed a bit for this year. There are actually 2 separate web sites now, 1 for the DE/MD layouts and 1 for the NJ/PA layouts.The older link will only show you Delaware and Maryland layouts.

Here is the link to the web site for New Jersey and Pennsylvania layouts:

themodelrailroadopenhouse.com


The format of the site is a bit different, I find it a bit difficult to understand as it really is a web site for PRR info with the model railroad open house schedule added in. But it is out there for everyone to enjoy, and I'm glad we do have volunteers to provide this info. Just click on the Schedule menu at the top to see the open house info.

Here is a direct link to the layouts open on the 19th of November in case you are planning to see other layouts in addition to mine:

http://pennsyrr.com/index.php/mroh-schedule/event-calendar/day/20161119?catid=2

Hopefully I'll see you then. Now back to the layout to get some more things completed before the open house!

(Note: As mentioned, for the DE and MD open houses, the old site of http://modelrailroadopenhouse.com/ can be used)

Friday, October 07, 2016

Sept 2016 Op Session

Last week on Wednesday 9/28 I hosted the NEK Op Session #4. I invited 7 guys over to help put the layout through it's paces and see how things fared. The process is helping me determine the best way to sequence and run the trains that I have scheduled, and also provides insights into how I can better convey the operations I want to run on the layout to the operators. 

We got through almost the whole schedule and things ran pretty smooth. The track cleaning and CRC 2-26 treatment definitely was worth the effort as there were no electrical issues related to dirty track. A few things popped up with older turnouts not having power through the points, and a turnout that did not throw completely. These will be addressed before the next session.

It is always interesting to see how others run trains in different ways than I planned. And some things I just need to find a better way to convey to the operators. So some things are still a work in progress, but overall I think everyone had a good time.

Here are some pictures from the session.

Bruce got down to business in Morrisville breaking down train VM-2, the St. Albans to Morrisville LVRC train. The power is on the engine house track (the engine house is still to be built as you can see!)

Mark served as Yardmaster in St. Johnsbury, and he enjoyed the new method of throwing turnouts, using Touch Toggles (from Berrett Hill) on the panel in front of him.

Working with Mark as St. Johnsbury yard engineer was Joe. Joe handled locomotive movements with Mark working the waybills to get things figured out and keep an eye on the schedule. St. johns bury is the busiest spot on the layout, so how it runs dictates how the session progresses. Definitely a 2 person job!

Chris wore the right color shirt as he operated Canadian Pacific train 917 from Newport, He will have cars to drop and pickup, and then he will proceed to E. Deerfield MA. On the lead are a CP 424 and RS10 along with a B&M GP40-2.

John ran the LVRC MJ-2 train from Morrisville to St. Johnsbury. Here John is picking up a boxcar on the siding in Hardwick, and wondering how long he is allowed to block the road crossing.

I assigned a 2 man crew to the B&M train 4301, the White River Junction to Groveton turn. Here Bill and Chris handle the MEC interchange traffic at Whitefield. In front of Bill is another Touch Toggle panel for the 6 switches in this area.

Later in the run of B&M 4301, Bill and Chris arrived in Groveton to work the paper mill. Groveton has benefited with the addition of structures and scenery since he last op session when it was strictly plywood. A local switcher at Groveton assists in work of breaking down 4301 and getting it turned around and heading back south as BM 4302.

Phil was on hand to help out, and here is preparing to assemble the ballast extra from Hardwick to meet a Maine Central train of empties in St. Johnsbury. The ex-CR transfer caboose is new to the LVRC. Phil is about to pull the hoppers from the spur .
Phil has arrived in St. Johnsbury and is working to swap his loads with the MEC train of empties brought in by John. Here Phil has cut off his power, a Vermont Northern C420 and pulls forward. John is on the CP main with the MEC train. The yard crew looks on, waiting for this maneuver to finish so they can get back to work.

John ran the North Stratford to St. Johnsbury turn, MEC train TY-2/YT-1. Here John is using the passing siding at Crawford Notch to run around his train and prepare for the trek west to St. J.More trees arrived in Crawford recently, and the foreground buildings are part of the Whitefield scene.

Phil ran the MEC YQ-1/QY-2 turn from St. Johnsbury to Whitefield and back. Here is doing some work in East St. Johnsbury, dropping an empty pulpwood rack.

One last picture captures Phil working the Gilman paper mill switch job. This was a new assignment I added to handle spots and pickups ahead of train YQ-1. I had found that too much time was being taken by this train so adding another job alleviated the issue.
So at least this time I did remember to capture some pictures, which can be tough when everyone is caught up in the action. But slowly the kinks are getting worked out and the crew is better understanding the layout and the operations. Still more to do to as I keep learning from each session, but it will be fun to continue to refine things. 

Hopefully the next session will stay on track for mid-November.