I sent the photos and text below into our local NMRA Division, the NJ Division, as part of their newsletter series of "what I have been working on during these unusual times". It describes a freight car project with ties to my friend who passed away last year, Sam Natal.
 |
| Sam Natal at his Santa Fe layout |
I have been taking advantage of extra time the past few months getting to some projects that have been on the back burner for quite some time. If you are anything like me you have a number of unstarted, partially started or nearly complete freight car, locomotive and structure projects that, for whatever reason, never made it across the finish line. For me these tend to get back into their boxes and placed under the layout.
I have completed a number of freight car projects over the past few weeks, including a bulkhead flatcar conversion to a pole car complete with new telephone poles. The starting point cars for this were purchased 5 years ago! I also built a few Intermountain and Branchline kits I purchased many years ago. I often post pictures and some info to my Facebook page for my layout, Northeast Kingdom Model Railroad. If you are on Facebook, search for it and request to join - it would be great to have you aboard.
One project in particular I was very glad to finish. As many of you know, Sam Natal passed away late last year. Sam was a longtime NJ Division member (you can see his name on the original list of charter members on the Division web site) and he served on the board for many years. Sam helped guide the Division when I was superintendent, and revised our bylaws at the time to bring them up to date. Sam was a good friend, and served as a judge for the State of New Jersey. Sam was kind enough to perform our marriage ceremony in his chambers in 2002 when Tanya and I got married.
In the late 1990’s while Sam was building his layout, a number of us would join him for weeknight work sessions. One time while I was there Sam pulled out a painted but unfinished 2 bay covered hopper. It was in his favorite prototype’s mineral red pain, with Kadee trucks, gloss coated and ready for decals. Sam explained that the car was too modern for his early 1950s layout and asked if I wanted it to finish and use on my future layout, Sam offered it as a thank you for helping him with his layout, which was unnecessary I was getting plenty of enjoyment being there. But I agreed and took the car home that night.
It has sat for quite some time as I forgot about it and never looked into getting what I needed to complete it. A couple of years ago I came across some Microscale ATSF covered hopper decals. Remembering the car Sam gave me, I picked them up. For whatever reason though I still did not get started on finishing that car.
With extra time the past few months, I have been going through all the stored items I have, and found the car. I thought I had the decals, and when I checked the decal box, sure enough there they were. Not wanting this to sit any longer I got to work.
As the car was fully assembled and painted, I decided not to do any upgrades to the roofwalk, which shows its age (it is the old Ramax 2 bay covered hopper kit from the 1980s). I could not find a good prototype picture of this particular car on the Santa Fe. I figured I would just use the set diagrams and decal it to what the Santa Fe did on their other covered hoppers. I like to follow the prototype when possible, but allow leeway on my model railroad. And I really wanted to have this car finally done!
Decals complete, I gave it a flat finish, then some light weathering with pan pastels. Couplers were added and it was ready for an official builders photo before going onto the layout.
 |
| The completed Santa Fe covered hopper ready for service on the layout |
Somewhat belated, but thank you Sam, not only for the car but for your friendship, guidance and assistance, and also for being there for me and Tanya on our special day.
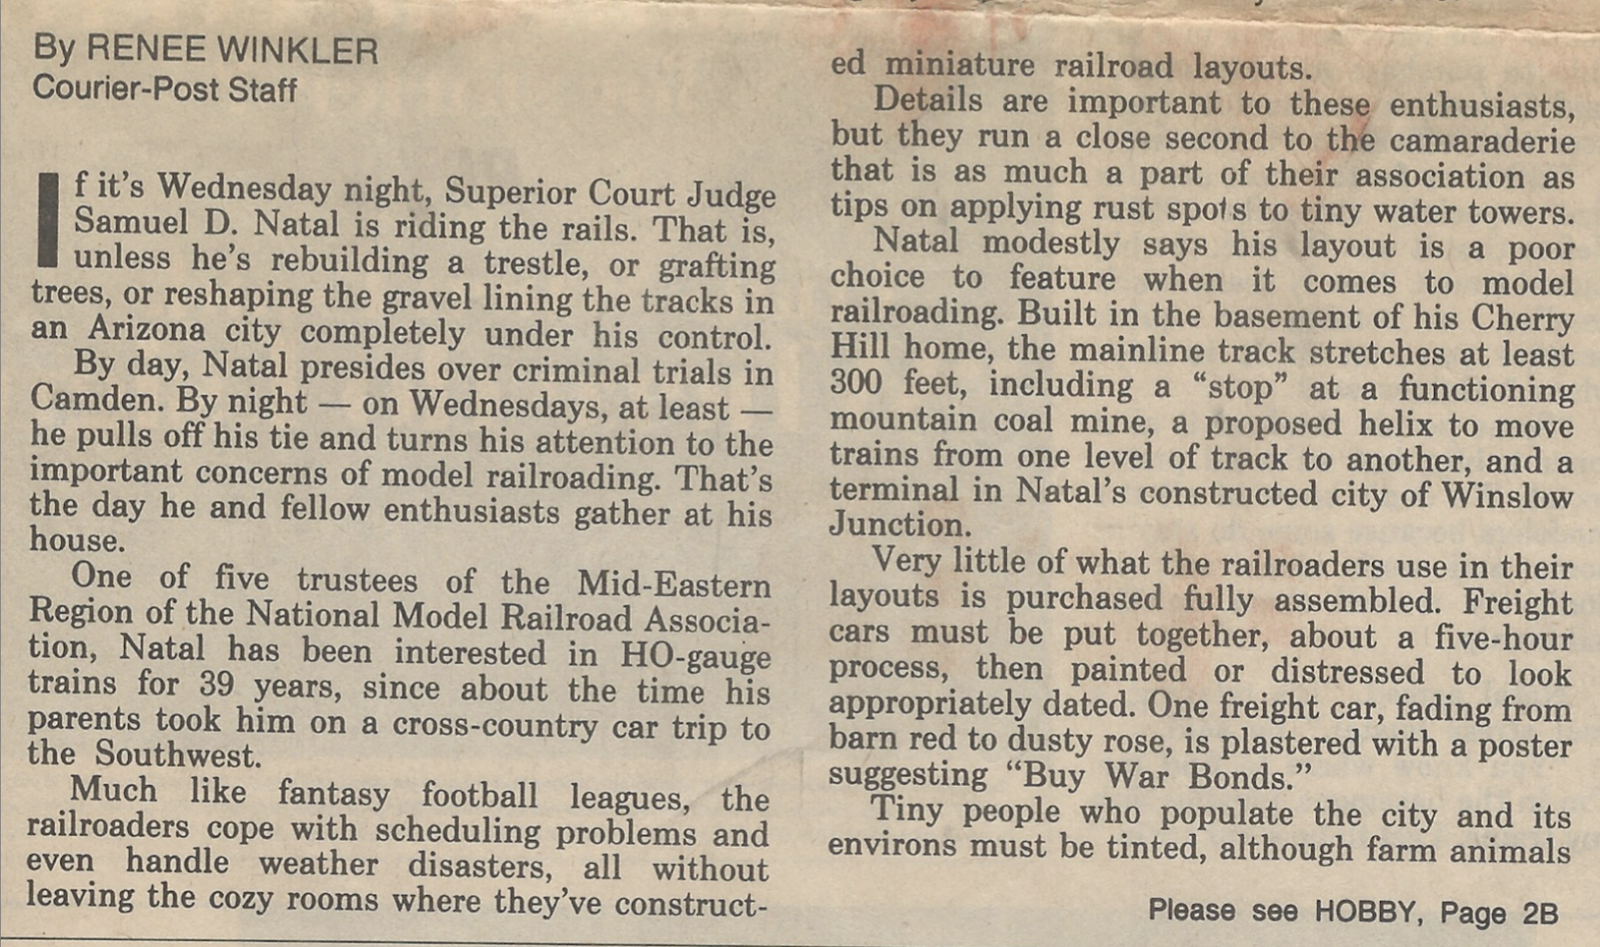
Below is text from newspaper article about Sam from 20 years ago or so.