Maine Central, Lamoille Valley

Maine Central, Lamoille Valley
Click image to link to my web site, nekrailroad.com
Showing posts with label Free-mo. Show all posts

Thursday, October 24, 2024

Updates

I have not really kept up with posting here on this blog, mainly because I post updates primarily to the Facebook group for the layout, Northeast Kingdom Model Railroad. Much progress has been made on the layout since the recent posts have been made here though. That said, not sure I really want to go through the effort of posting lots of updates here, it just takes more work to do, especially when photos are involved. And writing up text is work that could be directed towards model railroading activities. Not sure how others feel, but publishing and consuming content through a web site like this seems a little more "old school" It is easier to do things through an app on my phone to quickly share something out. Not sure if there is a "Blogger" app that would help in that regard.

Anyway, some updates.

Major scenery efforts were done in East St. Johnsbury and Gilman. Those areas are largely complete looking, although there is always more that could be done.

Track was laid for Lyndonville and sceniced around the edges, leaving the flat areas ready for development. This combined makes the whole peninsula look somewhat completed. 

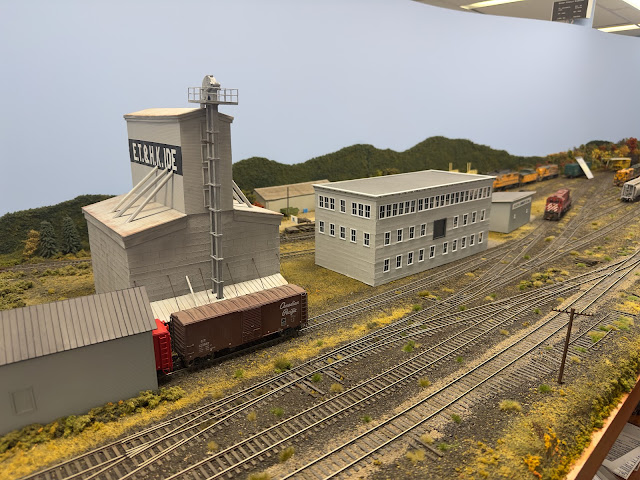
I did a major scenery effort to Morrisville, including building out the Lamoille Grain structure. Work is underway on the engine house structure, and I need to plan the background structures that will go along the wall to finish this up to a relatively complete stage. But just getting this track ballasted and and scenery in place really transformed things. This along with getting scenery all around Johnson except for the spot where the future talc mll building will go really makes this also look very finished. 

A number of structures were done. The ET&HK Ide building progressed to a good state, although I do want to build out some of the attached buildings and address the underpass and lower building level at some point. Also the Caldbeck Cosgrove building was built out, at a reduced scale, although it still needs the roof top structure element. 

For November, I decided not to join in on the open house tour this year. I have had a very small turnout the past few years and with other things going on I just did not want to dedicate a day or two to being available to the few who might show up. Maybe next year...

I will be at the Syracuse train show Nov 1-2 participating with the Free-mo layout. First time going to this show, although I have been to an NER NMRA convention there a while back. Good rail fanning, but I am not sure I will get the time to do that as we'll be doing full ops on the Free-mo layout at the show both days.

In January I will be back at the Springfield show, again with Free-mo. Always a great time, lots of model railroad fun packed into 3 days.

Here are some quick pictures from around the layout just to show things.

Whitefield


Feed Mill kit I picked up at Springfield in 2020 - fitting it into Whitefield area


Beecher Falls - Ethan Allen with completed NSRC S1 and 44 Tonner

Gilman

St. Johnsbury - structures in progress for ET&HK Ide and Caldbeck Cosgrove


Lamoille Grain - Morrisville

Morisville

Johnson


East St. Johnsbury

East St, Johnsbury

Lyndonville


Monday, January 21, 2019

Springfield 2019

Yes, it is that time of year agin, the Springfield train show! I'll be attending again with my Woodstown Jct. Free-mo modules in the Mallary building. Hopefully if you are attending also we'll get a chance to say hi!

Here is the working plan for the Free-mo layout this year, as designed by James Koretsky of New England Free-mo.

My Woodstown Jct 3-section module is at the lower right, a separate peninsula to itself


Tuesday, October 09, 2018

Free-mo pictures from NER Convention

I posted pictures of the Free-mo layout assembled at the NER NMRA Convention in Mahwah, NJ on my Flickr site. Click the link below to view the gallery.

https://flic.kr/s/aHskKefY2b


It was a good weekend. Set up went pretty well Thursday despite a few unplanned physical obstacles. We ran plenty of trains created with the ModuOps software which generates switch lists for the crews. Convention attendees as well as the Free-mo crew ran over 2 dozen schedules trains Friday and Saturday.

There was talk of maybe having Free-mo at the Syracuse convention next September, but that will probably depend on space available. But certainly it was well received again by the convention attendees. Going back the last few years we've had a Free-mo layout at the Laconia NH convention in 2013, the joint MER-NER Mt. Laurel convention in 2015, the Newport convention in 2017, and now this year in Mahwah NJ.

Wednesday, September 12, 2018

NER NMRA Convention, Mahwah NJ

I'll be at the Northeastern Region NMRA Convention this weekend in Mahwah, NJ, September 13-16. I'll mainly be on site at the convention hotel coordinating and operating on the Free-mo modular layout. We have modules from NJ, MD, NY and MA coming in for the show and we'll be operating Thursday afternoon through Saturday afternoon.

If you are at the convention, stop by and say hello!

Here's a look at the layout we will be building for this event:


If you are free over the next few days, its not too late to join in on the fun of the convention. For more info, check out erielimited.org.


Tuesday, January 31, 2017

Springfield Report

I'm back from the big Springfield show, and as usual, it was a great time. I did not hear anything about attendance, but it seemed very crowded both days. It was great to see so many familiar faces and talk to those I see maybe once a year. It was also great to meet and talk to those of you who read the blog and enjoy it. I'm glad you are out there following along!

Here are some assorted pictures and commentary from the weekend.

In addition to manning the Free-mo layout and doing operations (more on that below), I did venture out to the show floors across 4 buildings. I did not take too many pictures from the manufacturer booths, but here is one form Rapido showing some of their cool upcoming offerings. 

Got information I needed about LokSound decoders at the ESU booth.

Model Railroad Hobbyist magazine brought along their TOMA project layout (The One Module Approach to building a layout). I also talked a bit with Joe Fugate about his current and future layout.

It will be nice to follow along as MRH shares details on building this layout in their on-line FREE magazine.

Great scenery on the TOMA layout, which is based on the Vermont Railway.

Outside, a live, operating steam locomotive was on hand. It was nice to smell and hear this running during the weekend.


As figure 8 layouts go, and especially those using 3 rail O scale, this one is admittedly pretty nice!

The Free-mo layout was very linear this year, extending 200 feet, and included over 2 scale miles of mainline,  with additional trackage on 3 branches. This view is from my module area, near, but not at one of the ends. It goes all the way down to the just visible banner.
This is the track plan of the layout. The photo above looks to the left, with my module on the branch at the bottom right.


The recently completed FOS Scale Liquor Depot kit installed on the module. Looks like the local PD is checking things out, talking to one of the road crew.
A  new module at its first show demonstrated a clearance issue with a double stack train. Actually somewhat prototypical for a late 80s/early 90s mainline before clearance improvements would require "filleting" the stacks onto separate cars. No problem, as the owner quickly added additional base material to the bridge and the train proceeded without incident!


The weekend included free running on the modules, as well as Op Session time. Trains were made up in select yards and then instructions and a switchlist was provided to each operator. I ran light Maine Central power over to the Cedar Hill yard to pick up my train, a turn that serviced my Woodstown Jct, as well as the nearby Boston Street. Here I am returning with my train coming off the loop that transitions from the mainline onto the branch I am working.

My switchlist. The yard operator fills in the reporting marks of the cars requested by the ModuOps software, and my job is to spot these cars at each industry, and pickup the same number of cars (if they are there) to return back to the yard. My troublesome MEC 564 seemed to work OK throughout the weekend.

I arrived at Woodstown Jct with my train. The Lamoille Valley RS3 is the local switcher which can assist with local switching. This can be done with a second local operator, or solo using the second throttle.

I pulled my train up and let the local switcher work the tail end of the train for the facing point sidings and any cars for the yard side of the mainline.


A railfan talks to one of the railroad employees at the old freight house which now serves as a headquarters building for the local railroad.

With the local switcher having pulled all cars off the train and spotted cars at local industries, my train is ready to depart. the passing siding holds cars that will return back to Cedar Hill yard - No need to take them with me on the turn, I'll get them on the way back. Additional cars for the junction and other industries for the yard side of the mainline will be switched by the local RS3 while I am up the mainline at Boston Street.
Switching at Boston Street includes some street trackage. I've spotted a few cars and will now run around my train to drop the coal hopper at the facing point industry on my way back to Woodstown Jct. Once there I'll add the cars from the passing siding to the covered hopper seen here and return back to Cedar Hill yard.

We set up the Free-mo layout Friday afternoon into the early evening. On Saturday we operated and answered many questions to model railroaders and the public. So by Saturday night we were plenty thirsty. Here is about 1/3 of the gang enjoying drinks and dinner at a nearby establishment. Having fun socializing is one of the great parts about the Springfield weekend.
Looking forward to next year!

Monday, January 23, 2017

Recent work, and Springfield!

A quick update on some things I have been working on. But also, this weekend, the big train show up in Springfield, Massachusetts will be happening, and I'll be on hand again with my Woodstown Junction Free-mo modules, setting up a big layout with the New England Free-mo guys. Hope to see you there!

I was able to get the 2 new turnouts situated in Morrisville in order to add the new run around. Of course one of them had the points centered directly under a subroadbed support, but luckily it was as simple as removing a couple screws to get the support out off the way. I'm glad I followed hat advice about drilling up into the subroadbed from below instead of down from above. A few pieces of track reconnected everything, and a few new feeders, and I was able to successfully test it out running a train back and forth. No Tortoise machines yet - that will have to wait until after the Springfield weekend.

All track is back in place, and the siding to Lamoille Grain company is ready to receive a few loaded grain cars. Next up will be adding the Tortoise machines and doing some testing before paint, ballast and scenery repairs.
A while back, over on Trevor Marshall's Port Rowan blog, Trevor wrote about rebuilding his workshop and using some Ikea furniture to build things out. I have used a few different Ikea products, including my workbench and chair, a couple of racks for paint bottles, as well as a metal cabinet that stores lots of supplies. Trevor made mention of an Ike drawer system called "Alex" and how someone he knows uses it for extra car storage (Trevor went with some different cabinet choices). I've started to suffer from having completed and in progress cars and locos in various places around the layout room, so I decided to investigate this as a solution. It turns out to be a great solution, and I was lucky enough to get an after holiday 15% off sale price too. These would work well for lots of different things, like styrene sheet and strip stock, but I'm glad to have the one just for my various rolling stock and locos.

The unit provides 5 shallow drawers (the 2 lower are a little deeper) that work great for holding rolling stock and locomotives. I did not try to max out the space, but it would seem easy to hold upwards of 100 pieces or more of rolling stock.

The whole unit is on casters too making it easy to roll out and around if needed. This storage freed up a number of other areas around and under the layout and nicely centralized everything related to cars and locos not currently on the layout, but already out of their manufacturer boxes.
One of the drawbacks of the way my staging yard came out is the limited visibility for operators to see their trains when they enter or exit the yard. It is not overly complicated or a long distance to travel, but almost all operators prefer to visually see their train at all times if possible.

I've often thought a mirror would help operators get a visual on their train, just to see that they are moving and at what speed. Turns out we had another Ikea item in storage, purchased many years ago, a simple 9 inch square mirror. I played around with one to see if it would work. What I like is that it is not a giant mirror but just enough to see the yard ladder when you stand in the right place. I think the operators will appreciate this addition.

I made a simple triangular shelf and an angled support for the mirror. I used just one screw on the support so I could make some minor adjustments. After it was up, I decided to add a front trim piece to give a better appearance to the shelf. This mirror handles the Maine Central track into Portland bound staging (Portland, Bartlett).

A second mirror is up at the CP/BM end of the staging yard.  This one was built the same way.
This picture demonstrates how standing in the proper location will provide a nice view of the staging yard, making it easy to see trains on the move.
I've been slowly progressing on the ET & HK Ide building. I completed adding the embossed paper to represent the metal panels, and completed the loading dock, overhang, and windows and doors. Up top the windows are covered over. In front of them will be the unloading chutes up to the conveyor. Two holes in the roof were added so these can pass through. Still plenty more to do, but getting there.

I decided to place the in progress structure in its proper spot on the layout between work sessions. As I do not have the road underpass (which would be where the CP Rail switcher is, over to the V&O boxcar), this structure is more representative than prototypically accurate. Still I am trying to capture as much of the look and feel as possible.
One final project, I installed a Soundtraxx SoundCar into a BAR boxcar. I really wanted to get this done before Springfield so I could take it up there to try it out.

All the components are installed, including the SoundCar module on the roof (so it can be operated with a magnet), a Current Keeper module to prevent sound drop outs, and a spare Railmaster speaker I had on hand that doesn't seem likely to fin fit into any of my locomotives. 
Initial playing around was pretty neat. The consist via magnet works great. I adjusted a few volume settings, so I look forward to running this on trains through Woodstown Junction and out on the big Free-mo mainline this weekend.

Thursday, August 25, 2016

My New Favorite Roof

I am in the process of assembling a FOS Scale liquor store kit. It will be destined for my Woodstown Jct. Free-mo module as it is a little too modern sign-wise for my 1980 layout. It is a pretty nice little kit and I'll post some more photos and thoughts when it is completed. But I wanted to mention the roof. Here is a picture of it before adding a sign and chimney:

I'm quite happy with how this roof came out
In the kit the roofing material was simply a piece of white paper with some scribed lines. Nothing really good about it to be truthful. The instructions mentioned painting it black and gray, and that's it. Hmmm...I've done the black roof and it always seemed too black to me, even if I weathered it with some chalks.

So I decided to experiment. I lightly sprayed the roof paper on the back (non-lined) side with gray primer from a spray can. After drying I had a uniform gray roofing material. Too uniform though. So next I took flat black spray in a can and misted that over the gray. Just far enough to not fully coat it. A few larger drops of black appeared here and there, so I misted more gray over the black to blend it together. The results were just what I wanted. A black roof that has been subject to a quite bit of sun which caused fading. I did not even need to do any additional weathering with chalks or paint.

I cut the sheet on the scribed lines (now on the unpainted side) and used transfer tape to apply to the roof. Any bad areas that had a paint drop that did not look good I worked around. Plenty of material to discard sections. I really think the look is good, better than most of the roofs I have done. I do like a few of the dark and light spots that appear that look like stains. The effect is real nice in person.

I'm glad I was able to turn a pretty mundane material into a nice looking roof for this building. A few more details and this one will be done.

Wednesday, February 17, 2016

Wiring work on the Modules

Having just completed a long weekend of Free-mo, I wanted to take care of a few things on my modules while it is still fresh in my mind. I don't have a plan yet for the next Free-mo event, but I want to make sure a few issues and upgrades are taken care of before that occurs.

I have clamped plastic throttle holders to my module to make a place for them to reside without adding a permanent projection from the side fascia, which is something to avoid on modules as much as possible. This would be easily damaged in transit or set up. I noticed Bill Grosse had taken the idea a step further on his modules and mounted his plastic holders to a thin piece of wood which is then clamped on to the module. This is a good idea and makes for a sturdier mount of the throttle holder. I decided to upgrade my pair to match what Bill has done, also painting them in the standard NJ Free-mo fascia color.

The throttle holder "block" can now be firmly clamped to the side of the module.
I have 2 clamp-on extensions for my module, one that serves as the shortline interchange off of the yard, and a one that can be used off of the mainline when no module is connected past mine. This allows a locomotive set, or loco and car to use the run around of the passing siding. While these were painted to match the fascia, the roadbed remained gray homasote. I decided to give these a spray from my favorite track color, Rustoleum Camouflage Brown, a great very flat railroad color. I'll also spray the track and rerailers. This will help them stand out a little less.

The Homabed is now darker to match the track placed on there after clamping to the module.
Free-mo as a national group recently decided to modify the standards for the wiring, converting from RJ connectors and trailer plug connectors to Anderson Power Poles, and also adding a DCC common bus line. I have had dual RJ and PP connectors for a few years, but decided this would be a good time to remove the older connectors and have just Power Pole, along with adding the DCC common and converting the accessory bus from trailer plugs.

The module is clamped onto the table top above my pool table in the "non-model railroad" portion of the basement.
 A great thing about the modules is being able to move them, turn them on their side, etc., when work needs to be done, as shown above. Here you can see my main bus, the loconet cable, the terminal strips at the ends, and one of the non-manual turnouts controlled by a Tortoise and a DCC/pushbutton control module developed by a New England Free-mo member.

Accesory Bus, DCC/Track power bus , and the DCC Common bus with their Power Pole connectors
You may be wondering about the wire colors (a lot of red there) and the Power Pole Connector colors shown. No standards exist for wire colors or Power Pole Connector colors. This may seem odd, but it becomes apparent that it is unfeasible once you take into account that a module left and right will change when you get to the other end. A black wire to the left rail will become a black wire to the right rail on the other end when you are facing the end. So I am using different colors where possible within my module to assist me, but in reality once wiring is done and working, you never need to mess with it on a module.

I am still working on this and also plan 2 other changes. First, I picked up some Cobalt intelligent turnout controllers in Springfield and I want to test it out on one of the module turnouts to see if it will allow me to convert it back from the ground throws. Although the ground throws continue to work, they are subject to damage from moving the modules, and also detract from taking realistic photos on the module. I need to make sure I can control the Cobalt from push buttons mounted on both sides of the module.

The other change I want to make is to isolate my module trackage from the DCC bus and include a circuit breaker. This way if a short circuit occurs (usually from running a turnout), I will not take out the whole DCC block and stop everyone else from running. This is the same as what you want to accomplish on a layout with separate power districts. Having 10 turnouts on my module usually means someone (like me) will forget to throw a turnout now and again, especially when they are switching and a someone starts to talk during a show. I'll be running a separate bus for the DCC, and tap into it for powering the circuit breaker. My existing track bus will be connected only to the circuit breaker, and I'll insulate the track ends to isolate my module trackage. So 2 more Power Pole Connectors on the intra-module joints only. More on this as work progresses.

Meanwhile work continues on the Crawford Notch station. I'll post about that soon, plus a few other small projects. And hopefully I'll have an Operating Session to report on in late March.

Tuesday, February 09, 2016

Springfield Wrap Up

A great weekend up at the Springfield show. The weather was much warmer than any time I have been there before. I needed to buy a D&H T-shirt to wear Sunday as it was so warm in the building. The crowds were pretty good and I talked to a number of new and also familiar folks about Free-mo and model railroading.

I posted pictures I took of the Free-mo layout up on Flickr. Go to the link below to see them all (76).

https://flic.kr/s/aHsktHAXzn

Woodstown Jct. setup and ready to receive visitors - people and trains!
Saw some cool stuff at the show, picked up a few things of course, but mainly enjoyed operating on the Free-mo layout and talking to people. I know I probably missed a few of you who visited however. We ran operating sessions both days, and it was quite a run I had on Sunday when I went from Italy Yard down the branch to Woodstown, about 200 feet. I switched towns along the way and decided to terminate in Woodstown rather than head back as it took me an hour to do that part of the run. Very cool!

It was great having so many new people join with modules. Others from NJ and a new group out of Albany, plus a fantastic Bridge module from Ontario joined in this year making for a spectacular layout. The show director was quite pleased with the layout and people's reaction to it, and we have the same space available again next year. James Koretsky of NE Free-mo did a great job with the plan, which fit the space perfectly. And Fred Hessler and Bob Hall, also of NE Free-mo did a great job coordinating an operating plan that offered plenty of trains to run and industries to switch.

My friend Anton assisted with my modules and also brought some of his road power to run. Some of his nicely weathered Canadian units were operated Sunday with a good deal of natural sunlight coming through a  roof sky light making for some great photo opportunities.

My GRS GP40-2W (ex-CN) and Anton's CN GP40-2Wget some sunlight on the bridge at Woodstown Jct.

We did experience some issues with short circuits within our power district. This brought to mind my desire to isolate my module from the bus and install a circuit breaker. This way if I am the one causing a short I won't impact others in the power district. So while the modules are out and it is on my mind I will spend a little time working on that, along with getting the rest of the Power Pole changeover done to match the revised Free-mo specs.

So sorry if I did miss any of you looking for me, but glad to meet and say hi to those that read the blog and were at the show.

If anyone has any specific questions, post a comment here and I'll respond.


Who needs a Pepsi?