Maine Central, Lamoille Valley

Maine Central, Lamoille Valley
Click image to link to my web site, nekrailroad.com

Monday, December 29, 2014

Railroad-Line Forum

There are lots of online places to look at and talk about model and prototype trains. As such, it is unlikely anyone can really know about or visit too many on a regular basis. I have a few places I like to frequent, and I also follow a few blogs here on blogspot to keep up with what is going on with some layouts I am interested in.

One place I do visit and post to is the railroad-line forum at http://railroad-line.com. There is some really nice modeling there and it can be a good place to ask a general question now and then.

railroad-line forum main screen


I recently started a thread there on my layout. A number of modelers here in South Jersey have active threads detailing their layouts with info and photos. A few of them include some great information that has helped my model building. For example, the use of grout as a scenery material was something I learned from Rick Bickmore, aka Harsco on railroad-line, in his great thread on building his layout.

My thread was started to focus on operations on my layout. It will be a way for forum members to see my layout and also allow for interaction regarding my operating plans. I hope to be able to detail my plans and show photos, and perhaps get some feedback on things I can consider and change to make for a better experience. The idea is to help me get operations off the ground with an initial session sometime this winter.

Check out my thread at this address:

http://www.railroad-line.com/forum/topic.asp?TOPIC_ID=44172

You do not need to have an account to view on the forum, but you do need one if you want to post or comment (it is free).

Wednesday, December 24, 2014

Merry Christmas!

Just wanted to wish all those who stop by here to check out my model railroad blogging a very Merry Christmas, and thanks for your interest in what I am modeling and continuing to check in here to see what is new.

Although I had trains at an early age, various train sets on 4x4 and 4x8 tables, I feel that I became a model railroader in 1980, at Christmas, when my parents left a copy of Railroad Model Craftsman under the tree. It really opened my eyes to scale model railroading and what people were doing that was so much beyond what I knew about "trains".

That October 1980 issue of RMC is pretty worn out now, I know I went cover to cover for weeks poring over every word and picture. Just the front cover alone with this realistic looking coupler I had never seen before was so realistic and fascinating. And weathered freight cars, trees, a road scene - such great stuff!


And to top that off, an article inside about Whitefield, New Hampshire's ball signal. This was a place I had been to! I didn't really know much about what happened in Whitefield other than that was where we came across trains during our summer camping trips in the 1970s. This showed me exactly what was happening there.


I would start picking up back issues of RMC and later MR and absorb everything model railroading that was between the covers. It was a great education in how to do all things related to the hobby.

I still keep this issue in my office with other railroad books and special magazine issues that I refer to often. And I am glad to see RMC rise again with White River and continue on. Hopefully an issue this year will make it under the tree for a young kid interested in trains, and help them start a journey into the hobby of model railroading and all it has to offer.

Everyone be safe and have a very Merry Christmas!!!

Monday, December 15, 2014

Facing point switching

We have a local Conrail (Shared Assets, so it is still Conrail, shared by CSX and NS) branch nearby that runs out of Camden's Pavonia yard towards Mt. Holly. It is former PRR and then Penn Central, and it used to go further east, and was called the Pemberton branch. It even featured passenger service including RDCs into the 1970s, and when the line went to Fort Dix, featured troop trains during WWII.


Back to the present day, the line sees trains pretty much every weekday. And as pointed out by Lance Mindheim in various articles and clinics, not every industry is switched every day. There are a couple of different industries that receive different car types, so sometimes it is easy to tell what will be switched just by looking at the manifest of the freight train.

One thing that is interesting is how I have seen the crew operate facing point sidings. Although there is a run around further down the line, the local does not always make it all the way there based on industries that need to be switched. One of these is a paper company that receives a number of boxcars from the northeast, Canada and the upper midwest. Sometimes the train is only switching this one industry in a day's work.

I have seen the train with 2 locomotives on the head end work a facing point siding by stopping short of the siding, separating the lead unit from the train and pulling it into the siding. Then the second unit with the train pulls past the siding. The lead unit backs out onto the main track and is able to work the train from the rear, pulling the cars in the siding and respotting cars as necessary. This includes putting some cars back that have not yet been unloaded, and spotting cars at specific delivery doors. All of this has been covered by Lance various times, and it is good info to use when designing, building and operating your layout. It takes a bit of time for the crew to switch a single siding. A lot of times on a model railroad, we simply pickup what is there and drop off what we have. On the prototype it is much more complicated and time consuming, but if you like to operate, a lot of fun.

Lately I have noticed that the crew has arrived with a locomotive on each end of the train. This eliminates the need to separate the locomotives once at the facing point siding. Here is a picture I took recently as the train stopped in Maple Shade across the street from a Wawa (a local convenience store in our area) to grab lunch before getting busy switching further down the line.

The 4 man crew has exited the train to pick up lunch before continuing work further down the line.
A quick look at the boxcars on this train, and the fact that the train is 6 cars in length, confirmed that they only needed to switch the facing point paper company siding this day.

I find this interesting as I have been looking at how to operate 2 locations on my layout that have facing point turnouts in regards to the locals that will switch them. Lyndonville along the CP and Johnson, the talc mill along the LVRC, both not only have facing point sidings, and are also complicated by coming off the mainline which is on a grade.

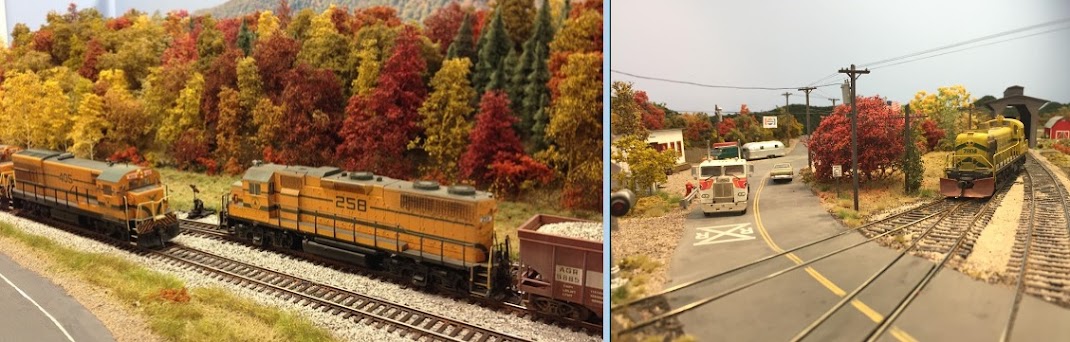
This earlier work in progress photo shows the siding at Johnson. The yellow LVRC loco is downgrade. Operationally, this siding would be getting cars out of Morrisville, upgrade and along the track at the bottom left of the photo. A local would therefore approach this siding head on, a facing point switch to be worked.

A model railroad solution would be to add a run around off the main, or as part of the siding itself. Sometimes that is prototypical, but usually not. It is interesting that when the paper company located along this CR branch in the 1990s, the railroad built the siding but did not build anything extra such as a run around track to make switching easier. They knew there were ways to accomplish the task without building more track.

Another solution is the out and back turn local train that only works trailing point switches on the way out, and then trailing point on the way back (which were previously facing point). Sometimes that is how Conrail switches this siding, just going right past it on the way out, and then switching it on the way back towards Camden. That doesn't work for me for perfectly as I do not model the portion of the line where the Canadian Pacific turn around would occur.

For example on the CP, the local originates out of Newport, which is staging on my layout, runs to Wells River, also staging on my layout, then turns back for the return trip. I could get around this by first operating the return train coming back from Wells River before modeling a different local train in staging that would then switch Lyndonville as a trailing point siding. It would work, and best represents what the prototype did. The oddity would be modeling 2 different versions of the local.

Another way around this might be to do some active staging during the session to put the locomotives and caboose on opposites ends while in staging, and then have the train operated later in the session. This would preserve the locomotives and cars of the original local turn, and I could drop and add some cars within staging representing work done off the visible layout before returning. However this would require someone to actually do this during a session.

But another option is to look at what the Conrail local is doing and use 2 locomotives operating independently on my local. Either of the 2 methods would work well, and with DCC it is easy to duplicate. In my era, it would have been more likely to split the locomotives at the siding instead of having one at each end of the train.

Another advantage is that this method eliminates problems with the mainline on the grade. For example, if it is switched as a trailing point siding, I cannot leave anything on the main without some sort of braking system for the cars left on the main. Even the caboose would have to be switched into the siding complex, which does not seem too prototypical (outside of needing to clear the mainline for through freights). By having the locomotive proceed past the switch (and go downgrade), the locomotive will provide the necessary "anchor" to hold cars on the main while the switching work is done.

I can't say I have decided yet on how I think it will be best to operate these 2 locations. All these methods will work, and I can certainly try each of them out to see how it goes with the operators. The key thing is that by looking at the prototype, I found another solution that could be employed.

One last picture of a car in this train, a Maine Central boxcar, albeit in Pan Am paint. Somewhere under there is the Harvest Gold and green pine tree. Occasionally I have seen some older paint schemes on boxcars for the paper company, but that is getting more scarce nowadays.

MEC 31786, FMC 5272cf XP boxcar, series 31750-31899, built 1978.

Wednesday, December 10, 2014

Free-mo Layout in Bordentown

The annual Bordentown Holiday Train show again features scale model railroading in the form of a Free-mo layout using modules from the NJ Free-mo group. This year we were able to arrange the layout in our space in a way that supports good operations. the layout features the car ferry module peninsula connected via a 90 degree curve to my Woodstown Jct. module. Due to space constraints my modules are set up without the 2 foot bridge scene. What we did though was use that as a switching lead section off of the car ferry peninsula module set. We had to do some special work to make this fit, and one of the sections of my module set is supported by removing the legs and turning them sideways in order to avoid a radiator. Overall this again showcases the flexibility of Free-mo.

The train show is open to the public for free Fri-Sat-Sun, 4 to 8, the next 2 weekends 12/12 and 12/19. It is also opened for visiting schools during the week helping expose kids to not only the big Lionel and Thomas stuff, but actual scale model railroading. 

Overall view of the layout.

Right after setup, no cars on the layout yet!


Mike Prokop's Camden Ferry peninsula module


Mike Prokop's module section with standard ends, the car ferry peninsula section is off to the right 
90 degree curve "mini-mo" comes in very handy

Tuesday, December 09, 2014

Morrisville Scenery

One other area that I worked on prior to the open house was Morrisville along the Lamoille Valley. It was somewhat unplanned but I had some inspiration to start something, and then ended up with more done than I would have thought. This is one of those interesting aspects about model railroading where you can end up doing something totally unplanned when you entered the layout room.

Before I discuss that though, I realized in my previous post I forgot to show one of the main pictures I was discussing, that being the view of the layout when you first enter the Layout room. Shown below, you can see how having the trees and scenery here is important as it is what visitors see first as they enter the room. I think that making a good impression here will subconsciously make the rest of the layout look good as well, even though other areas have less scenery and are less complete overall.

This door leads into the layout area. Now that the trees are planted, the appearance is of a completed layout.

A view looking back while in the layout area provides perspective on the amount of scenery competed in this area.

A while back I completed the track work for Morrisville Vermont, which is the center of operations for the Lamoille Valley. The area includes a small yard, a few industries and the engine house for the railroad. All of this is prototypical, but in my implementation, I have compressed things into something that supports operation more than it follows the prototypical layout of trackage. One of my goals is to support interesting operating sessions, and in my space I really cannot dedicate the 15 feet or so of space required to model Morrisville faithfully. 

So one night I was working on my car weighting project, adding additional weight to all cars bringing them up to 7 to 9 ounces each (see earlier posts on this topic). I started work on an Atlas Plywood Mfg. double plug door boxcar. It got me to thinking about the car operating on the layout, and soon I was looking at the 2 spurs for Morrisville Lumber.

A while back I had read and heard about using Fast 'n Final lightweight spackling for roads and had a container on hand. AsI looked at the tracks and thought about how I wanted the tracks to be embedded in asphalt for forklift unloading of lumber-products boxcars, I figured, why not give this stuff a try and see how it works?

Next thing I know, I am spreading out a layer of Fast 'n Final around the tracks to represent the asphalt. I find that the material is very interesting and different than say plaster. It tends to stick to itself better than other things, at first. This makes it very easy to control. I would get a little on the rails, and it was a simple matter to just remove it with no residue. It is almost like a putty in that regard. Anyway, it is really an interesting product to work with.

I built an initial layer and let this dry overnight. I should note that I added black craft paint to get a gray color that looked like sun bleached asphalt. The next night I applied more and took care to get the product leveled and even with the height of the rails. And letting this dry another night, I cam back and used small amounts to fill in any areas that were still not flat, and also added styrene pieces between rails. It is probably possible to use the sparkling here too, and as it dries, clear out a flange way. But I would try that on a test piece first before committing it to a finished track on the layout. 

I then used some chalks to weather things a bit, and tried used a black Sharpie to create the look of cracks that have been filled with tar. Not sure if I totally like that look or not, so I may revisit that.

The Fast 'n Final dries very hard, but is still a little pliable and soft which I think will prevent any chipping like plaster. Overall I was pretty happy with this and will use it again elsewhere.

Here is a look at the scene. I added the Motrak Models brick shed, some wrapped lumber and a forklift for the open house. I plan to add more details and lumber later.

The overall area. The idea is that the lumberyard structures are mainly off the layout and this is the receiving yard.
 

The Caboose Industry Ground throws along the front edge are easily accessible and somewhat blend in with the scenery.

To help blend in the edges of the asphalt, I decided to add a little scenery base to the area. This is part of that "one thing leads to another" aspect as well. I built up gravel, dirt and static grasses, and it quickly looked like a completed scene. I decided to work this scenery all the way along the front edge of Morrisville. I found it really amazing how that quickly transformed the area into looking much more complete than it is.

The yard tracks in Morrisville are behind the initial scenery added to the front edge of the layout.

From a normal viewing angle the area looks like much more complete than it is. Like many of my areas with more trackage, I have integrated a shelf under the area into the fascia.
This has gotten me to thinking that adding a basic scenery treatment along all of the front edges, from the fascia back for a couple inches, or up to the track, would not be a bad idea to focus on in the remaining areas that are not sceniced. There might be a spot or two I want to leave alone until I have planned the area, but a lot of it is just basic scenery in these areas and I think it will go a long way to making the layout look more complete.

One other area I started the thought process on was Whitefield. In addition to the diamond and ball signal BM-MEC crossing, I wanted to include a bit of the downtown area. Whitefield has a small little section of brick and wood frame business buildings along Routes 3 and 116, and I'd like to include a representation of this on the layout. Most of my layout is either rural or focused on rail served industries, so a place to add a few other kinds of structures will be fun. 

I wanted to have the Stella Models diner in a good spot that can be easily viewed, so starting with that, I worked on a scene that goes slightly uphill representing Rt. 116. Again, not an exact prototype replication, but something that captures the feel of the area. this will be another area where I can use the Fast 'n Final, and also have a grade crossing with the B&M line heading south.

The B&M will cross the road here, the MEC is on the bridge to the back. The area to the right will need additional planning as it will include an industry switched by the B&M.


Monday, December 01, 2014

Fall progress


I started general cleanup and also worked on some scenery prior to the open houses. Straightening up took a bit of time as the layout area was housing a lot of stuff from upstairs while a remodeling project was going on in the kitchen during the summer and into September. After getting stuff out of layout area, I was able to put train stuff back where it belongs, clean track and stage trains for running during the open houses. Next I wanted to do some scenery in order to have some visual progress for repeat visitors.

First up was an afternoon of building about 70 trees for the Crawford Notch area. Nothing too difficult here, just takes some time. I start with the Scenic Express Super Trees, and working from the box separate and break off tree-like sections, different shapes for different uses. These get a quick hit of black primer and set aside (I do this in the garage near the open door to keep the paint smell out of the house). Once I get a bunch done, I get to adding the leaf material. I have 3 methods to do this.

The first and more traditional is to use ground foam. I use this a bit less now as I prefer the next two methods, but it still produces good trees, and some of the Fall colors I have from Scenic Express look good. I spray the tree with inexpensive hair spray from a pump bottle (Suave, Rave, etc. in the super hold-extra sticky variety). Then I sprinkle the ground foam over the tree structure, letting the extra get caught in a shirt box so I can recapture and reuse it. I usually put a second coating of hairspray and another ground foam coating, then I stick the tree to dry in a piece of foam with holes poked in it.

I should mention I do not go through the process of dipping trees in matte medium and hanging upside down as mentioned in the instructions. I'm sure this does a good job, and certainly helps straighten trees, but to be honest I just don't have the patience for all this extra work. Anything that is bent I address during planting by putting it next to other trees, letting them help "straighten" each other.

My second method is essentially the same as the first but I use the newer Scenic Express Noch Leaf Flake. They make some nice Autumn colors and the look is better in my opinion than most ground foams. One thing I did notice though is if I put a second shot of hairspray it tends to darken the color. Sometimes that is OK, but other times it makes the color too dark, so some care is needed here, In many cases less is more with this material anyway.

My final method uses a Tacky Web Spray Adhesive from Scenic Express followed by an application of  Scenic Express Super Turf. This material is more like pieces of ground up sponge-like material, a bit more airy looking than ground foam. I use this for a lot of the "green" fall trees on the layout. The web spray helps this adhere better to the Super Tree material and I usually do not do another coat of this adhesive or the hair spray. Some pieces will fall off before planting, and these I generally collect and reuse.

Here is a look at two of the foam pieces with trees drying:


And here are some shots of the area after planting. I still need about another 50 or so trees along the backdrop to get me out of this section of the layout. Luckily the grassy area behind the tracks as well as the foreground do not require any additional trees. It is a amazing how quickly what you think are a lot of trees get used up in a relatively small area!

Train RY-2 passes through Crawford Notch with U18B 405, while GP38 258 sits on the siding.

GP38 258 heads up ballast extra YZ-X from St. Johnsbury, VT to Bartlett, NH, waiting in the siding at Crawfords.
Winter is coming, got to get the plow out and in place for the upcoming season!
I often get a question about my photo backdrops. These are images on CD from LARC Products. They are printed on full page labels (8.5x11) and then trimmed and mounted, abutting to each other to make a seamless photo. Here you see just the tops of Fall mountains, this representing the White Mountains around Crawford Notch.

Here is a look at some trees that I make into birches. I use a little white craft paint over the trunks and then use yellow Leaf Flake material for the leaves. Makes an effective looking birch I think.

The shanty was built from a Hogdon kit around 1990 - nice to finally have it in use and at it's actual prototype location!


And here is a stepped back view of the area. I pretty much doubled the trees in this area, they extend about another 2 feet to the right. Now I just need to finish up the foreground scenery, including a gravel parking area and the addition of some signs for Rt. 302 and Crawford Notch State Park, and build the Crawford Notch station kit. I also need to add more people and some vehicles as this is a popular spot always with some people around, even when it is a chilly day in October of 1980!