Maine Central, Lamoille Valley

Maine Central, Lamoille Valley
Click image to link to my web site, nekrailroad.com

Monday, January 26, 2009

Layout Fascia


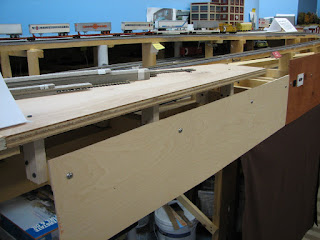
One comment from a recent posting asked me to elaborate a little on my layout's fascia. In general I use quarter-inch Birch plywood from Home Depot, sold in 2 x 4 foot sections. I hand pick through it to get non-warped good looking pieces. One side is usually better than the other. The smaller size of these pieces actually makes it easier to work with although I need more supports added to the benchwork. I cut the pieces to size to fit the area and attach them with stainless steel screws with mounting washers. These give a real nice look to to the layout and I take care to mount them evenly to help promote a professional look. After the pieces are installed I stain them with Minwax Cherry gel stain. I top that with a few coats of water-based Minwax polyurethane applied with a foam brush, lightly sanding between coats. Pictured to the right is a new piece added in Lyndonville, a section just getting started.

On the end of the peninsula I set the wood for mounting on a curve and bent the plywood around to match. I think it gives a nice complimentary look top the curve of the tracks.

In some areas I am using pieces of 3/4" pine and also poplar. I selected pieces without knots. Some of these were used because they were leftover from a previous layout and I did not need more than the 6 inch height they provide. In other areas I used it to build out shelves, as evidenced here in St. Johnsbury. I recall seeing something similar on another layout years ago and thought it would be a good idea to provide some flat surfaces to put things while building, working and also during operating sessions. It has been one of the most commented on features of the layout from other modelers. It was not too hard to build but does require a little forethought to provide adequate benchwork support and clearance. Basically the shelf rests on the 1 x 2 cross pieces direclty on the L-girder, while risers wee used to support the actual yard (plywood base).

Under Morrisville, I did another long shelf like St. Johnsbury. In this picture you can see how the birch plywood simply butts up to the shelf section. It is all just built in place to fit and I add wood t the sides and behind the shelves to keep a good look to it. The shelves will be built in different areas mainly where switching activity will take place.

I have a not had any issues with the fascia and it cleans up real well if I spill some scenery material or glue on it. I know that this is a bit more effort than other styles of fascia (i.e. Masonite) but I like the look of wood and I think the Cherry color fits the theme of the layout, New England in the Fall.

As far as access, I have not built any doors or access panels in as of yet. Hidden track under the LVRC between Danville and Sheldon Jct. is basically accessed from underneath. But I may have to consider that a bit more as I get on to the areas with more hidden staging. The CV staging is probably OK because it is not close to the edge anyway. I may actually consider open areas below structures for some access. The Newport/Montreal staging is in place against the wall. If I build the fascia out far enough, i can ensure access from below and behind the fascia.

If there are any more questions, just add them in the comment section for this post.

Monday, January 12, 2009

Locomotive Projects

As mentioned earlier, I spent some time working on locomotive and car projects. This I guess was a natural follow up to all of the caboose work I did in the summer! I had some things I wanted to finish and get onto the layout for the openhouse, so I concentrated on getting these lingering projects completed.

First up I worked on the Lamoille Valley's tourist train by completing a pair of coaches and RS3 #7803. The coaches are by Hornby. I could only get them lettered so I used Solvaset to remove the lettering and then used a Microscale alphabet set to letter them. I was not sure what the LVRC used for numbers on their coaches, so I just used 1203 and 1204. These Hornby coaches are nicely detailed and with 4 wheel trucks and a shorter length they work well on the layout. They closely resemble the real coaches I have seen in pictures, although they are a little darker green than the prototypes.


To pull the train, I added 7803 to the roster. This followed the usual LVRC RS3 paint and decal process, although I decided to keep the weathering light and also paint the trucks silver. This seems to match the photos I have seen of tourist trains. I also added a Soundtraxx Alco DSD sound decoder to the locomotive, putting the mini oval speaker in the cab. It was a tight fit and I had to remove the weight over the rear truck as it interfered with the enclosure. But pulling two coaches is no problem for the unit. I am going to see if I can remove part of the weight and then reinstall it. It is nice to have some sound on the LVRC now!


I also completed a long in process locomotive project, a pair of B&M GP9s. These have a long story, starting about 7 years ago when I happened upon a pair of Front Range GP9 shells molded in blue. I immediately thought of B&M Geeps because of the blue plastic, so I bought both for $9 total. I had no idea how I was going to finish them however. Over the years I accumulated parts and such for the project but never really started it. One big obstacle was the frame, trucks and drive train. I thought maybe I could use an Atlas GP7 mechanism, but the shells did not fit. About 4 years ago I found a pair of Front Range GP9s on eBay. I quickly picked these up, although this gave me another set of shells with no frame (oh well!). With everything on hand I finally started the project, about 2 years ago.


This was very much a project like I used to do 20 years ago. Lots of Details Associates and Details West parts added. Drilling and installing wire grab irons, rebuilding the plows to better match the prototype. I'll spare you the blow by blow process as I doubt you'll be building B&M GP9s from Front Range models (why p2K has not done a B&M GP9 I cannot figure).

Of interest is that I equipped these with Lokpilot decoders and put a DSX sound-only decoder in one unit. This was a new experience. The Lokpilots are nice and run the motor quietly, not bad considering it is a 20 year old original can motor. I did have some problems programming 2 decoders in one loco. I had to use separate addresses and temporarily cut the sound decoder wire to program only the Lokpilot, but eventually I got it all working.

Another "neat" thing about this project was when, after I painted the shells and prepared for decaling I realized I only had one set of B&M Herald King decals. I was certain I had more, but no, just the one. What to do? By coincidence I had just recieved an e-mail from another modeler letting me know that HK was back in business. I called them up and ordered the same set I already had. Amazing! The new decal was exactly the same as the one I bought 25 years ago (although it cost 5 times more). This seemed to indicate to me that this project really deserved to get finished!

I must say this was much more complicated than using locomotives produced in the last 10 years or so. I think we (or at least me) have started to really take for granted the amount of details and the quality of locomotives produced now. They tend to really be ready to run and only need weathering to get them on the layout.

One other locomotive to note (there were a couple others, but they are still in progress: MEC 564, LVRC 7802). With the pending release of the Intermountain U18Bs (April it looks like as of now), I ended up with some undecorated Atlas U23Bs that now will not get converted to U18Bs. What to do? Well, looking through my decal collection, I have a few sets of Herald King Lehigh Valley locos. I always liked this scheme. I also get a chance to operate on a layout that includes some LV trains and routes. So I decided it would be fun to do something different and give me a loco that I could take to the other layout on occasion. LV 512 is the result. I am happy how it came out. I made the weathering heavy but the engine is not too beat up as some prototype photos show. I also added a GE sound unit to this. The speaker was a challenge, but I got a mini oval with enclosure into the cab. It is fun to operate and gives a different sound then the rest of my locos. I could probably theorize that the Lamoille Valley leased a Conrail ex-LV U23B for a short period to help keep trains running on my layout...