Just wanted to let everyone know that I have started contributing to the Model RailCast Show, a podcast that you can listen to on your computer, iPod or other MP3 device. Starting with episode #112, I have been contributing segments on the prototype railroads of Northern New England. These segments are mixed to the regular show content and are about a 10 minute segment of the 90-120 minute shows.
Here is what I have contributed so far:
Episode #112 - North Stratford RR
Episode #116 - Canadian Pacific in Vermont
Episode #117 - Portland Terminal, Belfast & Moosehead Lake, Aroostock Valley
Episode #123 - Recap of the NER-NMRA Convention in Burlington Vermont
Upcoming is a look at the Maine Central's Mountain Division.
The MRCS podcast is a great way to find about other model railroaders, prototype and model railroads, manufacturers, big names in the hobby - and lots more. It is well worth a listen and can help make your commute to work or wherever a little more enjoyable.
The Model RailCast Show is hosted by Ryan Anderson and you can find out more info by checking out the website modelrailcast.com. If you like what you hear, please consider a small donation to the show to help keep it on the "air" and available to all model railroaders.
Maine Central, Lamoille Valley

Click image to link to my web site, nekrailroad.com
Saturday, October 02, 2010


Saturday, July 17, 2010
Photo Backdrops
I have been working on the layout during these hot summer months. I'll show a little bit of what has been going on for you now...
I had picked up some CDs of Photo Backdrops at the Springfield show in January and I decided to try and make use of them. These are the ones from Larc Products in New York. I printed on full page labels and then cut them out as instructed. I installed them in 2 places. The first is behind the MEC track between East St. Johnsbury and Gilman. I am pretty happy with how this turned out and I am looking forward to putting some trees and scenery between the backdrop and the track to finish the effect.

The next location I worked on was a new section, a shelf above the existing track at the end of the aisle. I added this to represent North Stratford. I'll detail a little more on how the trains get up to this level in a future post. This was an even longer run, with the backdrop measuring 11 feet I believe. Here is a look at part of it over the Gilman scene below.

I really like how these turned out and look forward to using them on the scenes behind Whitefield and Crawford Notch. I played around with using parts of them behind existing ground foam covered backdrops I installed along the LVRC, and I think this will work well also.
I had picked up some CDs of Photo Backdrops at the Springfield show in January and I decided to try and make use of them. These are the ones from Larc Products in New York. I printed on full page labels and then cut them out as instructed. I installed them in 2 places. The first is behind the MEC track between East St. Johnsbury and Gilman. I am pretty happy with how this turned out and I am looking forward to putting some trees and scenery between the backdrop and the track to finish the effect.

The next location I worked on was a new section, a shelf above the existing track at the end of the aisle. I added this to represent North Stratford. I'll detail a little more on how the trains get up to this level in a future post. This was an even longer run, with the backdrop measuring 11 feet I believe. Here is a look at part of it over the Gilman scene below.

I really like how these turned out and look forward to using them on the scenes behind Whitefield and Crawford Notch. I played around with using parts of them behind existing ground foam covered backdrops I installed along the LVRC, and I think this will work well also.
Thursday, July 08, 2010
Princeton Jct. Convention
My layout will be open for the upcoming NMRA Mid-Eastern Region (MER) Fall Convention, Princeton Junction 2010. Being held from Thursday September 30th through Sunday October 3rd, there is plenty to see and do at the convention. More details on the MER Convention Website, http://mer.nmra.org/MERConv/MERConv.html
I will open my layout on Thursday afternoon and Sunday afternoon. I was asked to submit 4 photos of the layout to the promotional committee, so here they are:


This does not show any of the unfinished areas, including the 2nd and 3rd phase areas of course, so there is more of the layout to see than this. But the finished scenes work better for promotional purposes.
Hope you can make it to the convention and a visit to my layout!
I will open my layout on Thursday afternoon and Sunday afternoon. I was asked to submit 4 photos of the layout to the promotional committee, so here they are:


This does not show any of the unfinished areas, including the 2nd and 3rd phase areas of course, so there is more of the layout to see than this. But the finished scenes work better for promotional purposes.
Hope you can make it to the convention and a visit to my layout!
Wednesday, April 21, 2010
DVD Review: Rails Along the River - WRJ to St. J
Just finished up watching the DVD "Rails Along The River: White River Jct. to
Pretty good overview of the line from south to north. Some period photos help explain the importance of this line in earlier times. Footage mainly from the 2000's, with some CP Rail RS18 footage from the early 1990s. Includes current
A little sparse on commentary about the trains themselves, but it does include some historical interviews about certain areas throughout the video that go beyond a normal train video, kind of like a Ken Burns documentary at times. Cuts to a topo map at each town are a nice touch as they help you see where the rail line is in relation to the
Some trains were filmed the whole length of the line, so you see the same train in a run-by multiple times in different locations which starts to get old after a while. Also, you sometimes want a little more of a shot, or a less zoomed in view, like when the train plows snow through a grade crossing, which is not as dramatic because it is zoomed in and you don’t see the snow bank getting blasted at the road. I did like some of the shots of buildings, stations and right-of-way intermixed with the train footage as it really helps with ideas for scenery and structures on a model railroad.
Coming in at 100 minute (with a 10 minute bonus feature and 10 minutes of ads for other titles), the DVD sells for $25 (I got mine for $19.95 at the show). Overall 3.5 out of 5 boxcars. Good video quality and good camerawork. Could have moved along a little faster and perhaps been just 75 minutes in length. But a good deal ($25 includes shipping and tax) and certainly a good look at something different than a lot of today’s videos that feature big trains from just the big railroads. More info:www.railroadvideodvd.com
Monday, March 22, 2010
Track in at Crawford Notch
With wiring tasks done for right now, I am turning my attention to getting sidings and passing tracks installed off of the Maine Central main line. First up was the small yard at Crawfords Notch. I pretty much followed the prototype by having a 3 track double ended yard. Operationally I will use this small yard to receive gravel cars from the LVRC that the MEC would use for ballast along the Mountain Division. These could be dropped by YR-1, but more likely I will have these delivered by a ballast extra, returning with empties back to Hardwick gravel on the LVRC.
I installed Walthers #5 turnouts and Atlas code 83 track here, but used a piece of Micro Engineering code 55 flex track for the far #3 track. Pictures show this track as being pretty light and somewhat overgrown in 1980 as it was not used too much I suppose.
After getting the track in and feeders wired in (aaahh, more wiring!), I ran a local MEC train through the tracks to see how they worked. Next I stalled Details West tie plates and turnout brace castings on the rails facing the layout edge. This is the first scene visitors will encounter when entering the layout room, so I want to make it look as good as possible. However I used up all that parts I had, so I need to get some more to finish up here. Also, the castings are too big for the code 55 track, but I might be able to install them and then file down what extends above the rail. We’ll see.

For turnout controls, I went with hand operated throws as this is right along the layout’s edge. I decided to give the Caboose Industries high level switch stands a try. I am not sure yet if I like these. They do look a little better than the standard ones in use on most layouts. But they are a bit delicate and I am not sure how they will hold up over time. I actually broke one by throwing it back and forth too much while getting the alignment right. We’ll see how it goes. I do like being able to add the target to the pivoting rod. That is neat.

I also plan to use this yard in a somewhat freelanced way by having a local out of St. Johnsbury travel to the yard, pick up any cars for North Stratford dropped by RY-2 and then run around the train to head back up the line towards Whitefield, taking the switch to North Stratford. This will then travel to a section on a shelf above Groveton to interchange cars with the North Stratford. I’ll post more on this later when I build that small section. It will make a nice model railroad operational job, although it is not prototypically accurate.
Next up will be adding the interchange tracks in Whitefield between the B&M and MEC, getting the B&M mainline track in place, descending downhill, under the MEC line and into a hidden section that turns back and heads to Groveton. Here is a look at the Micro Engineering bridge on the MEC and the B&M roadbed underneath. I attached Chooch abutments here although I need a small stone block to reach the bridge footings.

Thursday, March 18, 2010
It Ain’t Fun, But It Has To Be Done
Wiring of course. I don’t know too many people who enjoy it. I don’t mind too much as I like the results you get, being able to run the trains or operate turnouts, etc. But it is tough to get under the layout and reach areas for soldering, work on wires in tight spaces, etc. Luckily it is something that you do and get out of the way, and if done well, you do not need to revisit it too often!
A lot of time recently has been spent getting the wiring done on the third phase section. All feeders have been put in on the staging tracks and the Maine Central main line. Next up was the installation of Tortoise switch machines for all remote turnouts, in staging and also on the main where it is not close to the front of the layout. In all, I installed 15 Tortoise machines and wired them into Digitrax DS44 stationary decoders in the last couple of weeks. My knees are telling me “Enough!” with crawling around, getting up and down and sitting in awkward positions to get the Tortoise alignments correct. I still have at least 4 more Tortoise’s to install, although these are in places where the turnouts are not yet installed (the B&M line leading into Whitefield and the MEC switching at East St. Johnsbury for Maple Grove Farms and Ciment

Another wiring task I took on prior to the Tortoise blitz was installing a remote Short Circuit panel. This feeds off of the PSX circuit breakers that split the layout into separate power districts. As I could not determine a good local location for each short circuit indicator LED ( I do not have local control panels), I decided to centralize them and install them above the backdrop in the central peninsula. This makes them visible from about 80% of the layout. I might still run another local LED over to the paper mill sections as they are visually behind this indicator board. But this is better than walking over to the DCC shelf to look for the warning LED on the circuit board. I built the panel out of styrene, making a small box. I ran the wires as a bus from the circuit boards and used regular LEDS from Radio Shack in plastic mounts. I printed the background on my computer using a drawing program and setting the background to black with white text. Here is a look at the panel:

I plan to build some more panels like this to show turnout positions as well as track occupancy lights for some of the hidden tracks on the layout. I picked up a few IR detectors from Boulder Creek Engineering to install on the
Layout Update
It has been a little while since I posted an update on the layout, so here comes a few updates on the layout in a couple of postings.
Work on phase 3 has been progressing nicely since I started construction back in August. I have all of the benchwork and mainline track in place prior to the open houses in November, so I was able to run the trains on this section. This was also the debut of the U18Bs and they performed quite well (operationally and sound wise). I’ll give an update in a lnear fashion, moving from the existing layout area starting at Gilman and finishing up at the other end of the room.

Putting the trackwork into this latest phase solidified some things that were up in the air and opened up some new possibilities. First, I removed the MEC Connecticut River bridge crossing. It is nice to see a train roll through a bridge, but it just felt too cramped and forced right next to the paper mill at Gilman. It also created a difficult scenery situation. So now I extended the track out of Gilman into the area where the bridge was, which gave me a nice sized passing siding and a realignment of the mainline through a broader curve. I still have to get in there and finalize the actual track sidings and of course get some of the paper mill building built. But Like this arrangement better. Hiding the hidden CP track behind the mill is also easier now as it will just be behind trees. To the right is a look at the revised Gilman area.
The MEC line after Gilman will parallel the CP line and head behind a new foreground scene that has been opened up. Before, I planned to have Whitefield in the 2x 8 area across from Gilman, but it was just too hard to fit the track in correctly. So I moved Whitefield further down the benchwork on phase 3 and created a new area as a destination for B&M local trains, the Groveton paper mill. This will provide a good switching location for an operator and give some purpose to the B&M trains crossing and interchanging with the MEC at Whitefield.

In the picture you will see the 3 tracks along the wall. The far track is the CP mainline into staging (having come out of St. Johnsbury’s south end) and the near track is the MEC main. In between is the staging track for the B&M, representing the south end (i.e. White River Jct.) From this staging track the B&M train will come “on-line” to the layout entering Whitefield. It will then travel and turn back on itself, descending as it does (more on this later). It will end up here on the pink foam which will be the Groveton paper mill. I will also incorporate an interchange track with the Grand Trunk as another car destination (and I could make it an operational interchange if I want to add some GT engines to the layout!).

After Groveton, the tracks pass through the utility closet to the rest of the phase 3 section. The B&M track into Groveton will pass in front of the doors on a shelf or drop leaf. In the picture the MEC track curves towards the front as it approaches Whitefield. The B&M track is in the middle, also heading to Whitefield. The far track is the CP heading to the staging yard.
Here is an overall look at the bulk of the phase 3 section built since last August. The front track near the edge of the layout is the MEC. The B&M track/roadbed is seen heading diagonally towards the diamond crossing and then along the front of the layout edge, descending to a turn back curve and then reappearing under the staging yard and the MEC track (the spline and Homa-Bed is the B&M). In the back is the double ended staging yard to handle CP and MEC trains at each end. There are 6 tracks in total and this, along with their length will fully support all the trains I will operate. The staging yard will be hidden by a short backdrop, allowing someone to peer over it to see the yard, but visually separating it from the foreground scenes. The sidings and interchange tracks at Whitefield still need to be added and are next up on the work list. At the far end is Crawford Notch and the curve that leads into the other end of staging, representing


I’ll close out this post with 2 more views of the new area. The first is a look in the reverse direction, back towards where the above photo was taken. Here you can see the existing layout sections to the right, and Crawford Notch is directly on the left. The throttle is sitting atop the B&M line.

And finally a look at the new section from the existing layout area where St. Johnsbury is located. In this view you are looking directly at Whitefield. The freight cars in the background are in staging will get hidden by the short backdrop coming later.
Sunday, October 18, 2009
MER Hagerstown: Day 4

I programmed the GPS to hit 4 layouts in order on the way back east. This included an in-progress N scale layout by Steve King, plus a nicely completed Western Maryland layout (although oddly no trains were running) and a HUGE N&W layout. These were well worth the stops. After dropping off Anton, it was another 2 hours up I-95 and back home.
Another great NMRA convention weekend. As I always say, if you've never taken advantage of one of these conventions, you are really missing a great time. Try to get to the next one in your area. Next Fall should be a trip north to Burlington, Vermont for the NER convention. Hope to see you there!
Saturday, October 17, 2009
MER Hagerstown: Day 3

Then we headed back to the station and got some pics of the train before the 11am departure.

The train ride was very cold, with unheated cars. At least we were not in the open-air cars (some people were!). We headed out the picnic area and the wye. Originally we were to picnic here, but instead we ate in the car. But man, it was cold in there! We did get off to get some pictures of the train. Tough to get a good shot with all the people walking around, but I was real happy with this photo:
 After the train got back it was into the car to get warm!! Had to run the car and sit there for about 10 minutes until it was safe to head back out. Next up was a tour of the shop buildings. Really interesting (and cold), looking into the machine shop that runs off of a central belt drive system, then over to the roundhouse to see all the locomotives, and finally into the paint booth building to see the rebuilding process on a combine. Lots of great info about how the railroad operated in the early 20th century and a chance to see some of the current behind the scenes activities of the tourist line.
 After the train got back it was into the car to get warm!! Had to run the car and sit there for about 10 minutes until it was safe to head back out. Next up was a tour of the shop buildings. Really interesting (and cold), looking into the machine shop that runs off of a central belt drive system, then over to the roundhouse to see all the locomotives, and finally into the paint booth building to see the rebuilding process on a combine. Lots of great info about how the railroad operated in the early 20th century and a chance to see some of the current behind the scenes activities of the tourist line.
With that, we were able to head back to the hotel. After some rest and dinner, we went back to the convention hotel to check out the after-banquet activities. The live auction was entertaining, although I did not find anything to bid on.
Friday, October 16, 2009
MER Hagerstown: Day 2
Friday and we have some time to figure out what to do. First up we catch a clinic on layout design by Lance Mindhiem. Well done and plenty of good points made. Wanting to get some railfanning in and seeing a break in the rain, we decided to head down to Harpers Ferry WV to catch some CSX action. This is neat place of course with tunnels and bridges, a double track mainline plus a restored station that gave us some shelter while we waited on the trains.

We did catch a train, a westbound empty autorack powered by one diesel, but that was it in the 2.5 hours we were there. This seemed very unusual for a weekday; perhaps the weather was playing a factor. I only got video of the train, so I'll include a shot of where the train was, showing the bridge and the tunnel looking eastward from the station.

With not much train action we decided to head back to the hotel to get ready for the night's op session. We drove to Blue Ridge Summit early in order to visit the nearby hobby shop, and then after catching some dinner went to Brian Wolfe's really nice Western Maryland layout. Although the layout is still in progress, there are plenty of finished scenes, and everything operated very well. I signed up for the York switcher job, which was a great little op session of its own. After the morning train departed I had all session to switch local industries, work the interchange, make up the next day's outbound train and then make up a local to head out on the line to switch some on-line customers. Lots of fun! Anton had his hands full working the Hagerstown yard. Here are some pics from the session:


This is some of the local industries outside York where I delivered cars. As you can see, very nice modeling. Very enjoyable to operate this area.


Here is the Hagerstown yard where there was lots of activity. This was in the next room over, with the track on the shelf to the left connecting the 2 rooms. Anton (center) has his hands full, not only with the yard work, but also battling his fellow yard operator to keep things running smooth. One night I was glad NOT to get the main yard job!
The session ended around 11:30 and we headed back to the hotel to try to get some sleep before the early wake Saturday morning for the EBT trip.
Thursday, October 15, 2009
MER Hagerstown: Day 1
In Hagerstown for the Mid Eastern Region NMRA convention, the Western Maryland Transfer. I headed south on Thursday to meet up with my modeling buddy Anton. As he lives minutes away from the MB Klein hobby shop, I was obliged to stop in and find something I needed! After finally getting a chance to see Anton's layout in person (CP Rail/CN present day theme), we headed west into the mountains. Rain fell the whole time I drove south and continued as we drove west, something that would repeat all weekend as it turns out.
We arrived at the convention hotel with just enough time to register before heading out to an operating session that night. We saw plenty of NJ Division people in the hotel lobby, and also had familiar faces join us on the operating session. We drove out to Mike Shockey's Great Northern themed layout. This was a fairly large layout with most track in place, but not too much scenery yet. We had a good time operating for a few hours. Even though we managed to run into trouble in the session right away, we did get through all the trains and had things running OK by the end of the night. A good first night, and thanks to Mike for hosting (a Capital's fan, but I won't hold that against him!) [Sorry, did not get any pics this first day to post]
Friday, September 18, 2009
Layout construction for phase 3

First task was taking apart the temporary benchwork and moving everything out of the way in order to have a clear area to work in. This means a few things had to move into the other layout area creating a (temporary) mess. This part was hard because I really enjoy the finished area, looking at the layout and running trains. But this will be just for a short while.

With the area cleared out I started building the permanent benchwork. I actually started at the far end near the workbench and the window because this is the spot I needed to have the Maine Central turn back to head into staging. So I worked with the curve I wanted to figure out how far out to bring the benchwork and still leave room for the workbench. Drawing on paper or the computer is one thing, but seeing some wood and and track in place really helps you make sure you are on the right path.

The benchwork moved along pretty quickly and I realized I should probably paint the walls the sky blue color, even though I may have backdrops brought forward in some areas. It would have been easier to do before the benchwork went in, but it wasn't too hard with only the basic L-girders and cross sections in place.

I built a section under the layout to store my Free-mo modules. Had I planned the modules before the layout was started I could have come up with a way to incorporate them perhaps. So they will only be for module events and can be worked on in the aisle or in the garage.

So work will continue, but I do have a deadline coming up. the layout will be open in November for the annual layout tour throughout NJ, PA, DE and MD. Check out modelrailroadopenhouse.com for a full list. I will be open on the 8th and the 14th this year.
Friday, August 21, 2009
B&M "Un" Covered Bridge


As we came to the end of the trail, it was tough to find the exact way back to complete the loop. Following along the river we found a little trail that led back to the old rail bed. Once on the rail bed we turned left and I could not believe what I had found.

This is a railroad bridge I first read about in Model Railroader in August 1993. I was never able to figure out where it was exactly along Rt. 2 even when looking while driving. Although not far from the road, it is almost impossible to see through the foliage. But I did actually start building a model from the article, which included drawings and scratchbuilding instructions. I never quite finished it and it has been sitting in a box, partially constructed for about 10 years.


It was neat to finally find this bridge. Now it has inspired me to get that model finished and get it into the B&M portion of my layout. That is where benchwork is currently going in what I refer to as my third phase area. Here is where my construction of the model stopped:

Friday, July 10, 2009
HN2009: Day 5 - 7/10
Friday in Hartford and it is time for the National Train Show (and agreeing with Tony Koester that this should be the NMRA Train Show really). The first 3 hours are just for the NMRA attendees, so we all have a chance to walk the floor before it becomes crowded with the public. After the Digitrax forum last night, I checked out (and picked up) equipment to switch over to Duplex Radio. Nice to have Digitrax right there as they were able to update the software on the throttle right there at the show. I also picked up the Erie Cafe model from Stella Models that I want to use in Whitefield as cafe along main street.
I must say that there were not as many manufacturers and dealers as I thought there might be. Still plenty to see but not as much as I thought there might be. Nice to be able to talk to some of the people behind the manufacturing of the products we use. I was able to see preproduction models for the Rapido CP caboose coming later. These will look good on the CP freights on the layout! There were also some pretty good display layouts from various groups.
After about 5 hours of checking out the floor, I was ready to sit down, So I headed upstairs to catch the afternoon clinics. I decided to find out more about JMRI and DecoderPro. I really came in cold, even though I feel pretty comfortable with computers and DCC. I really knew nothing about JMRI and using it with DCC. Well, I must say I am really looking forward to trying out JMRI when I get back home. Some software on the computer, an interface to the Digitrax command station and I will be ready to go. The best thing is programming decoders via DecoderPro. It makes it real easy to make changes and save them to a Profile. This way you can make all the settings without worrying about actual CVs and hex values. Nice. And you can save the settings so you can easily reprogram to copy the same settings to another locomotive. Also lets you do Ops Mode programming and do locomotive speed matching. Also a nice demo showing the software in action and having it run on a Mac laptop, so I know it will work OK and not require a Windows machine.
This is one of the great things about conventions - coming home with some information to make your model railroading better and more enjoyable. Another great aspect is the people you meet. All week it was great to see familiar faces as well as meeting new people. People I see regularly at Division Meets, people I only see once a year at regional conventions and also new people I have met just this week. I look forward to seeing some of these new acquaintances at future conventions.
After another walk around the show floor and a little rest in the hotel room, I headed back for the evening clinics. I dropped in on the craftsman kits clinic. Next up I figured I would drop in on the Forced Perspective clinic along with a room full of other folks. Well, it seems the presenter was missing in action, so I ended up re-presenting my clinic on designing and building the layout. I hope it was a nice fill-in for the people in the room. I definitely got good mileage out the clinics this week!
That pretty much wraps up HN2009 this year. I will be heading home on Saturday. I would have to say this convention was a real success on many levels. The committee did a great job overall, the venue was first class and John McGloin is to really be commended for putting together and running a great track of clinics.
I must say that there were not as many manufacturers and dealers as I thought there might be. Still plenty to see but not as much as I thought there might be. Nice to be able to talk to some of the people behind the manufacturing of the products we use. I was able to see preproduction models for the Rapido CP caboose coming later. These will look good on the CP freights on the layout! There were also some pretty good display layouts from various groups.
After about 5 hours of checking out the floor, I was ready to sit down, So I headed upstairs to catch the afternoon clinics. I decided to find out more about JMRI and DecoderPro. I really came in cold, even though I feel pretty comfortable with computers and DCC. I really knew nothing about JMRI and using it with DCC. Well, I must say I am really looking forward to trying out JMRI when I get back home. Some software on the computer, an interface to the Digitrax command station and I will be ready to go. The best thing is programming decoders via DecoderPro. It makes it real easy to make changes and save them to a Profile. This way you can make all the settings without worrying about actual CVs and hex values. Nice. And you can save the settings so you can easily reprogram to copy the same settings to another locomotive. Also lets you do Ops Mode programming and do locomotive speed matching. Also a nice demo showing the software in action and having it run on a Mac laptop, so I know it will work OK and not require a Windows machine.
This is one of the great things about conventions - coming home with some information to make your model railroading better and more enjoyable. Another great aspect is the people you meet. All week it was great to see familiar faces as well as meeting new people. People I see regularly at Division Meets, people I only see once a year at regional conventions and also new people I have met just this week. I look forward to seeing some of these new acquaintances at future conventions.
After another walk around the show floor and a little rest in the hotel room, I headed back for the evening clinics. I dropped in on the craftsman kits clinic. Next up I figured I would drop in on the Forced Perspective clinic along with a room full of other folks. Well, it seems the presenter was missing in action, so I ended up re-presenting my clinic on designing and building the layout. I hope it was a nice fill-in for the people in the room. I definitely got good mileage out the clinics this week!
That pretty much wraps up HN2009 this year. I will be heading home on Saturday. I would have to say this convention was a real success on many levels. The committee did a great job overall, the venue was first class and John McGloin is to really be commended for putting together and running a great track of clinics.
Thursday, July 09, 2009
HN2009: Day 4 - 7/9
Thursday at HN2009 is all about clinics with no other excursions planned. Plenty to chose from with 3 morning, 3 afternoon and 3 evening time slots with about 6 different clinics going on at any one time. Great job by the convention committee on what they have put together.
I attended a clinic on building an HOn30 module based on a Maine coastline scene. No, I am not planning another module diversion, but interesting to see some building and scenery techniques. The presenter, Sam Swanson, is from the Great Lakes area and is part of a modular group there. The influence of Hayden and Frary on their HOn30 articles from the 1970s continues, even outside of the New England area. Of interest was his use of Gator Foam for benchwork.
Next, I headed over to the large community area that was set up for breakfast and lunch to get some food. This was a great idea as it means you can eat locally between clinics and it also a good place to meet other people and have some conversations. I had Tony Koester join my table and I was able to find out a lot about the NMRA future plans, including the NMRA branding campaign, internet future directions, plans for the headquarters and the NMRA presence within the California State RR Museum.
The afternoon I volunteered to help oversee the clinic rooms, to help with any issues and help get rooms set up between sessions. After that I was able to drop in and catch Dave Frary's interesting clinic on building a museum display for the Nantucket Whaling Museum. Great layout he built and a neat time-lapse photo section showing the install into the museum.
Now, many people complain about the aging of the hobby and lack of newer modelers. I guess that is generally true, but I must say I do see a good number of younger folks here and also a good number of women modelers. Meeting both requirements I helped set up a room for a clinic entitles Model RRing for Women. The presenter was a young woman in her twenties who brought a complete layout in 2 sections, featuring a narrow gauge steam train with sound, operating on DCC! She is the modeler and her fiancee does not model. An interesting twist!
I attended a clinic on modeling rocks. This is from the guy that sells the rubber rock sections (not molds, actual ready to install rubber rocks. In addition to his product there was a lot of good tips for modeling rocks, cuts, debris and other scenery elements.
A little time to head out to get some dinner, than back for presenting my 2 clinics again tonight. After the first presentation, I had time to get in a clinic and I went to the Digitrax forum. I was able to learn about the new Duplex Radio products, what they do and what the new features are. I must say the room really ranged from experts to novices as far as DCC and Digitrax were concerned. I guess it was good for the newer people to get some questions answered, but unfortunately it stalled the presentation and I had to leave finally before the presentation ended in order to get back to my room for the final presentation I was giving.
A long day with lots of information gained and shared. But that is what it is all about!
I attended a clinic on building an HOn30 module based on a Maine coastline scene. No, I am not planning another module diversion, but interesting to see some building and scenery techniques. The presenter, Sam Swanson, is from the Great Lakes area and is part of a modular group there. The influence of Hayden and Frary on their HOn30 articles from the 1970s continues, even outside of the New England area. Of interest was his use of Gator Foam for benchwork.
Next, I headed over to the large community area that was set up for breakfast and lunch to get some food. This was a great idea as it means you can eat locally between clinics and it also a good place to meet other people and have some conversations. I had Tony Koester join my table and I was able to find out a lot about the NMRA future plans, including the NMRA branding campaign, internet future directions, plans for the headquarters and the NMRA presence within the California State RR Museum.
The afternoon I volunteered to help oversee the clinic rooms, to help with any issues and help get rooms set up between sessions. After that I was able to drop in and catch Dave Frary's interesting clinic on building a museum display for the Nantucket Whaling Museum. Great layout he built and a neat time-lapse photo section showing the install into the museum.
Now, many people complain about the aging of the hobby and lack of newer modelers. I guess that is generally true, but I must say I do see a good number of younger folks here and also a good number of women modelers. Meeting both requirements I helped set up a room for a clinic entitles Model RRing for Women. The presenter was a young woman in her twenties who brought a complete layout in 2 sections, featuring a narrow gauge steam train with sound, operating on DCC! She is the modeler and her fiancee does not model. An interesting twist!
I attended a clinic on modeling rocks. This is from the guy that sells the rubber rock sections (not molds, actual ready to install rubber rocks. In addition to his product there was a lot of good tips for modeling rocks, cuts, debris and other scenery elements.
A little time to head out to get some dinner, than back for presenting my 2 clinics again tonight. After the first presentation, I had time to get in a clinic and I went to the Digitrax forum. I was able to learn about the new Duplex Radio products, what they do and what the new features are. I must say the room really ranged from experts to novices as far as DCC and Digitrax were concerned. I guess it was good for the newer people to get some questions answered, but unfortunately it stalled the presentation and I had to leave finally before the presentation ended in order to get back to my room for the final presentation I was giving.
A long day with lots of information gained and shared. But that is what it is all about!
HN2009: Day 3 - 7/8
Tuesday morning, up early to head to the Danbury Rail Museum, it is an hour or so bus ride before we arrive. The museum is located in the depot for Danbury. The track arrangement here is very interesting with the old yard that now houses the museum collection circled by a multi-track reversing loop. It is like something right off a model railroad really. There are also some unused tracks of the Housatonic that pass by the opposite side of the depot as well.
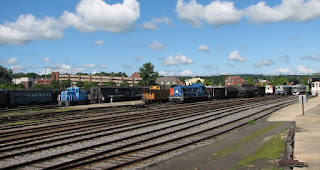
The museum collection is housed in a fenced in area on the old yard tracks. They opened up the gates for us and we had a guided tour of the equipment on site. Lots of interesting pieces on display, some very unique. I particularly enjoyed the MEC caboose #681 that we were able to walk through.


A Conn DOT commuter train came around the reverse loop for a crew change so I was able to get some pictures and video of the clean locomotive in a New Haven inspired paint scheme.

Pretty neat also was a refurbished PRR RPO. The inside was restored giving us a look at how the mail was handled and sorted aboard the train.


After looking around inside the depot we were taken on a short ride through the yard on a coach pulled by an SW unit. We headed out to the turntable, detrained and then took a spin on the turntable. Then it was back to the depot and onto the bus for the ride back to the convention center.

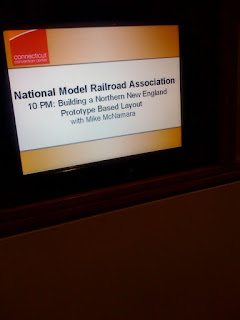
In the afternoon I checked out a few clinics before heading back to the hotel to recharge, get some dinner and get back to the convention center for the evening clinics. At 7pm I attended a slide presentation on the Bangor & Aroostock and Maine Central prototypes. Then it was time for my two clinics. First up was a look at the prototype railroads of Northern New England, followed by a look at my layout and the design process I used to incorporate 5 railroads onto 1 layout.
A note about the convention center - it is a great location for presenting clinics, but I do find the opening and closing of the rear door distracting and noisy. Before I started I propped the door open to prevent this distraction. It seemed to work out OK and there was not to much noise from the outside hallway. I guess there isn't too much you can do about people coming and going I suppose, but it would be nice if the doors worked in such a way to not be so noisy. A small nit I suppose. Otherwise the convention center is a good location, clean and modern. Very nice are the abundant displays with up-to-date information on clinics throughout as well as outside each clinic room.

The museum collection is housed in a fenced in area on the old yard tracks. They opened up the gates for us and we had a guided tour of the equipment on site. Lots of interesting pieces on display, some very unique. I particularly enjoyed the MEC caboose #681 that we were able to walk through.


A Conn DOT commuter train came around the reverse loop for a crew change so I was able to get some pictures and video of the clean locomotive in a New Haven inspired paint scheme.

Pretty neat also was a refurbished PRR RPO. The inside was restored giving us a look at how the mail was handled and sorted aboard the train.


After looking around inside the depot we were taken on a short ride through the yard on a coach pulled by an SW unit. We headed out to the turntable, detrained and then took a spin on the turntable. Then it was back to the depot and onto the bus for the ride back to the convention center.

In the afternoon I checked out a few clinics before heading back to the hotel to recharge, get some dinner and get back to the convention center for the evening clinics. At 7pm I attended a slide presentation on the Bangor & Aroostock and Maine Central prototypes. Then it was time for my two clinics. First up was a look at the prototype railroads of Northern New England, followed by a look at my layout and the design process I used to incorporate 5 railroads onto 1 layout.
A note about the convention center - it is a great location for presenting clinics, but I do find the opening and closing of the rear door distracting and noisy. Before I started I propped the door open to prevent this distraction. It seemed to work out OK and there was not to much noise from the outside hallway. I guess there isn't too much you can do about people coming and going I suppose, but it would be nice if the doors worked in such a way to not be so noisy. A small nit I suppose. Otherwise the convention center is a good location, clean and modern. Very nice are the abundant displays with up-to-date information on clinics throughout as well as outside each clinic room.

Tuesday, July 07, 2009
HN2009: Day 2 - 7/7
An early morning departure by bus takes us to Thomaston to the RR Museum of New England, home of the Naugatuck RR. A small collection of equipment is at the station along with our train, lead by an ex-P&W U23B with a New Haven logo applied. We board for a trip up to the runaround track in Waterville and then the locomotive switches ends and we head back to the station.

Next we ran back to the shops for a walking tour to see the rest of their equipment and their new shop building. Inside they are working on various pieces getting them back into running shape.

Out in the yard area, there are many pieces of rolling stock. Particularly interesting for me is the Maine Central boxcar in its rebuilt paint scheme. Very nice!

We got back to the convention center in the afternoon and I had time to catch a clinic before going to the Op Sig room for instructions on the night's operating session. The clinic I saw was on Phil Monat's layout, how he designed it and how he rebuilt it. A good introduction before I get to see the layout on Saturday.
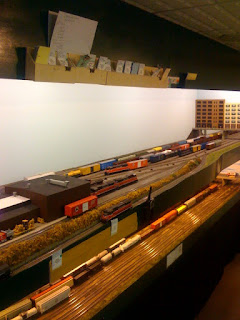
After heading back to the hotel to get changed, I headed east to Rhode Island to operate on Don Irace's P&W modern day layout. What a neat layout and a great one to operate. I got the yard job at Worcester and this kept me busy all night. I was pretty much on my own but I did have a coach nearby to help out and explain things as they came up. It was a great time and well run by Don and his crew. Here is a look at the Worcester yard, with Fresh Ponds yard below (run by another operator.
One last picture: Here is a shot of the dispatching panel on Don's layout. He also uses a dispatcher in Georgia to control half the layout. Wow!

Time to head back to the hotel. Early call again tomorrow as we head out to Danbury for a look at the museum there.

Next we ran back to the shops for a walking tour to see the rest of their equipment and their new shop building. Inside they are working on various pieces getting them back into running shape.

Out in the yard area, there are many pieces of rolling stock. Particularly interesting for me is the Maine Central boxcar in its rebuilt paint scheme. Very nice!

We got back to the convention center in the afternoon and I had time to catch a clinic before going to the Op Sig room for instructions on the night's operating session. The clinic I saw was on Phil Monat's layout, how he designed it and how he rebuilt it. A good introduction before I get to see the layout on Saturday.
After heading back to the hotel to get changed, I headed east to Rhode Island to operate on Don Irace's P&W modern day layout. What a neat layout and a great one to operate. I got the yard job at Worcester and this kept me busy all night. I was pretty much on my own but I did have a coach nearby to help out and explain things as they came up. It was a great time and well run by Don and his crew. Here is a look at the Worcester yard, with Fresh Ponds yard below (run by another operator.

One last picture: Here is a shot of the dispatching panel on Don's layout. He also uses a dispatcher in Georgia to control half the layout. Wow!

Time to head back to the hotel. Early call again tomorrow as we head out to Danbury for a look at the museum there.
Subscribe to:
Posts (Atom)