Maine Central, Lamoille Valley

Maine Central, Lamoille Valley
Click image to link to my web site, nekrailroad.com
Showing posts with label Locos and Cars. Show all posts

Sunday, August 02, 2020

Santa Fe car remembers a personal friend

I sent the photos and text below into our local NMRA Division, the NJ Division, as part of their newsletter series of "what I have been working on during these unusual times". It describes a freight car project with ties to my friend who passed away last year, Sam Natal.

Sam Natal at his Santa Fe layout
I have been taking advantage of extra time the past few months getting to some projects that have been on the back burner for quite some time. If you are anything like me you have a number of unstarted, partially started or nearly complete freight car, locomotive and structure projects that, for whatever reason, never made it across the finish line. For me these tend to get back into their boxes and placed under the layout.

I have completed a number of freight car projects over the past few weeks, including a bulkhead flatcar conversion to a pole car complete with new telephone poles. The starting point cars for this were purchased 5 years ago! I also built a few Intermountain and Branchline kits I purchased many years ago. I often post pictures and some info to my Facebook page for my layout, Northeast Kingdom Model Railroad. If you are on Facebook, search for it and request to join - it would be great to have you aboard.

One project in particular I was very glad to finish. As many of you know, Sam Natal passed away late last year. Sam was a longtime NJ Division member (you can see his name on the original list of charter members on the Division web site) and he served on the board for many years. Sam helped guide the Division when I was superintendent, and revised our bylaws at the time to bring them up to date. Sam was a good friend, and served as a judge for the State of New Jersey. Sam was kind enough to perform our marriage ceremony in his chambers in 2002 when Tanya and I got married.

In the late 1990’s while Sam was building his layout, a number of us would join him for weeknight work sessions. One time while I was there Sam pulled out a painted but unfinished 2 bay covered hopper. It was in his favorite prototype’s mineral red pain, with Kadee trucks, gloss coated and ready for decals. Sam explained that the car was too modern for his early 1950s layout and asked if I wanted it to finish and use on my future layout, Sam offered it as a thank you for helping him with his layout, which was unnecessary I was getting plenty of enjoyment being there. But I agreed and took the car home that night. 

It has sat for quite some time as I forgot about it and never looked into getting what I needed to complete it. A couple of years ago I came across some Microscale ATSF covered hopper decals. Remembering the car Sam gave me, I picked them up. For whatever reason though I still did not get started on finishing that car.

With extra time the past few months, I have been going through all the stored items I have, and found the car. I thought I had the decals, and when I checked the decal box, sure enough there they were. Not wanting this to sit any longer I got to work. 

As the car was fully assembled and painted, I decided not to do any upgrades to the roofwalk, which shows its age (it is the old Ramax 2 bay covered hopper kit from the 1980s). I could not find a good prototype picture of this particular car on the Santa Fe. I figured I would just use the set diagrams and decal it to what the Santa Fe did on their other covered hoppers.  I like to follow the prototype when possible, but allow leeway on my model railroad. And I really wanted to have this car finally done!

Decals complete, I gave it a flat finish, then some light weathering with pan pastels. Couplers were added and it was ready for an official builders photo before going onto the layout.

The completed Santa Fe covered hopper ready for service on the layout

Somewhat belated, but thank you Sam, not only for the car but for your friendship, guidance and assistance, and also for being there for me and Tanya on our special day.


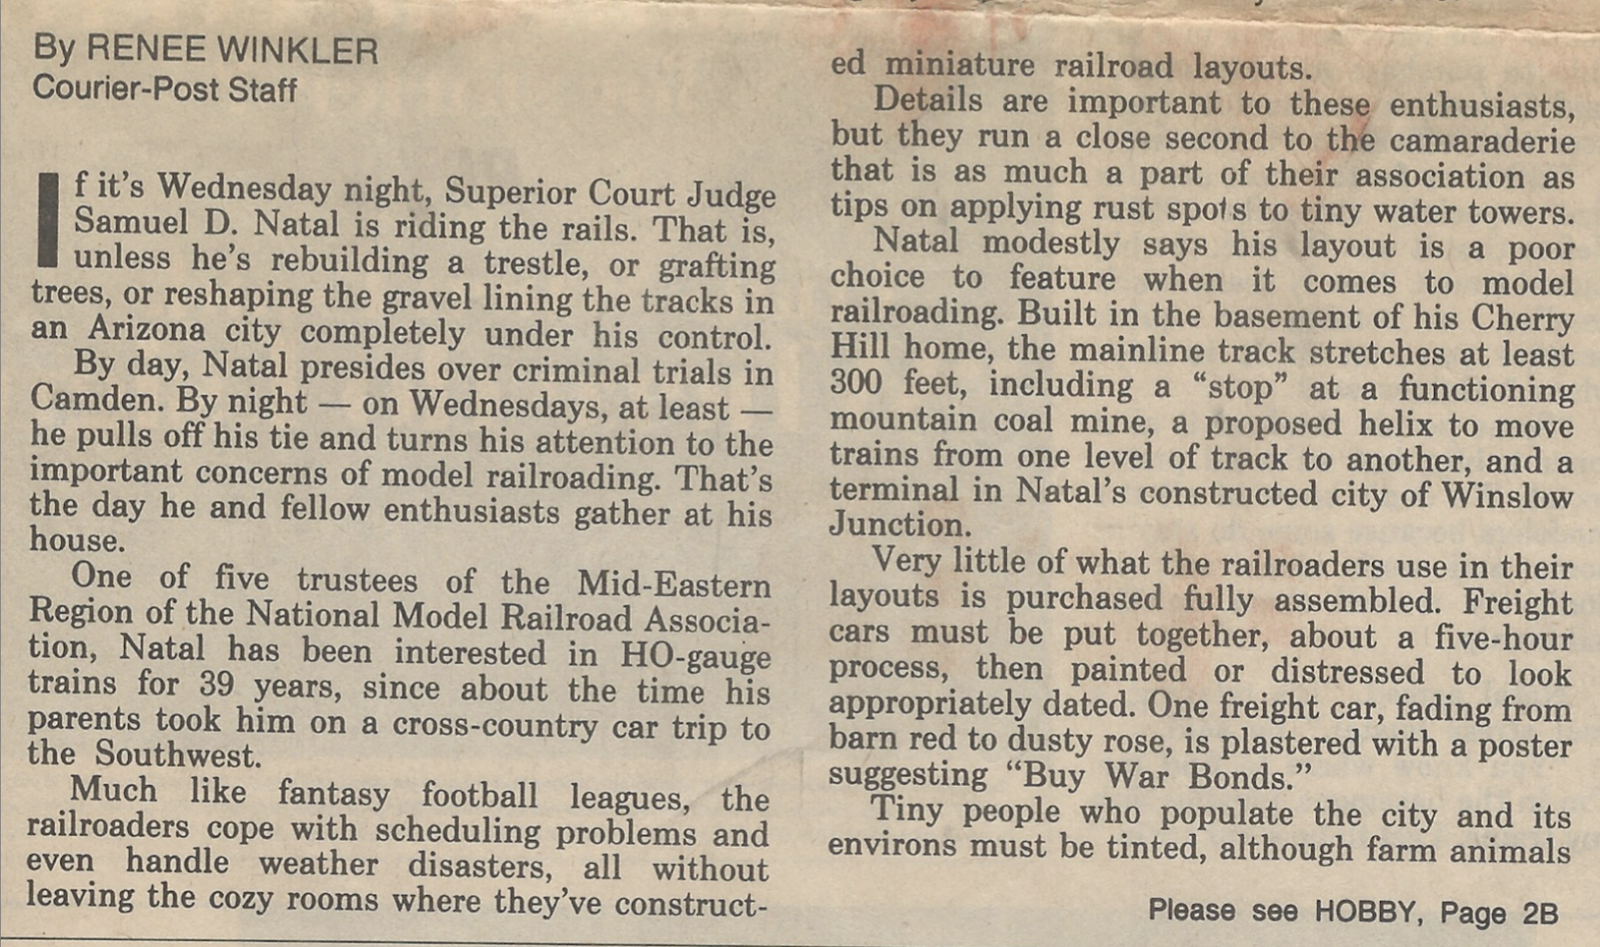
Below is text from newspaper article about Sam from 20 years ago or so.


Thursday, February 07, 2019

TBT - Kadee Ad 1980

I was going through the October 1980 issue of RMC to get an article for someone, and while paging through I cam across this ad from Kadee. It really took me back to my earliest days in model railroading with the simple fascination of a working coupler like this. A huge leap from the X2f couplers I had on all my equipment.


Also interesting to note the style of the ad. Look at all that text! You never see anything like that today. A lot of information and salesmanship going on there, but times sure have changed in advertising!

Interesting to note this is the days before the Kadee patent ran out and no one but Kadee made these couplers. A point they mention. The interesting thing is that I (and many others) still feel they make the best version despite new competition. I think that only helped drive them into new products, lie the scale head coupler.

I like the line that you should use Kadee couplers because your friends are!

Tuesday, September 26, 2017

How I Spent My Summer

Well, Summer is officially over now and Fall is here. I realize I have not posted since May, so a whole season has passed. I must admit that I have been pretty tied up with other things and have not done much model railroading. But hopefully now things will settle down and progress will continue on the layout. Plus there are some events coming up I need to prepare for.

So much like going back to school, here is my How I Spent My Summer report, specifically from a model railroad perspective.

I wrapped up Spring finishing up a flatcar load project. Inspired the Kalmbach Freight Car projects book I picked up at Springfield, I worked on an open lumber load for a bulkhead flatcar. This used inexpensive wood strips purchased at Michaels, glued together and then "tied down" with EZ-Line.

This Walthers NAFX bulkhead flat was sitting unweathered and crying out for a nice load. It also allowed me to add some needed weight concealed within the load.
I also started some scenery work at Johnson, building up the landforms and putting in the Route 15 roadway. This has some basic scenery in place and next up will be finishing the road with striping. I'll post more on that once the scene is further along, but I did get a good head start before the summer hiatus. (You can see a bit of the work completed in one Op Session photo below).

In late June I held another Op Session. This included another new operator to break in. All in all it went well, although I still need to work out some wrinkles in the overall plan as we still did not get through a full schedule yet. Here are some pics:

Bill Howard held down duties at Morrisville and has a good handle on things now. Meanwhile Joe Hueber attended his first NEK Op Session, and is bringing the LVRC train through Johnson, where you can see a little preview of the scenery going in there.

Chris Conaway worked the Gilman local job, which had some new twists that worked out well, easing some of the pressure on the St. Johnsbury yard operators.

Phil Duba wa son hand again and worked the B&M Groveton local turn up to Whitefield. This job also had some new twists that I found worked very well. 
Bruce Barrett and Mark Fryzstacki again worked the St. Johnsbury yard and have become quite proficient in keeping things fluid. 
Throughout each month if the summer I was able to attend the Op Sessions at John Rahenkamp's large Clairmont, Lewistown & Western layout. I have been holding down the Bayview job and have taken and posted a number of pics and some video to the NEK Layout Facebook page.

This shot comes from early in the session as I am picking up empty coal hoppers to build the coal trains over in the yard to head back up to the PA coalfields for reloading. This view shows just a small number of the nice urban buildings John has built for the layout.
In July we returned to the White Mountains for some vacation time. I did not spend too much time seeking out the trains in this area as I have visited many times and have many pictures. However one rainy day we took a long ride up north and I came across the New Hampshire Central trackage above Whitefield, up to Groveton and North Stratford. It was interesting to see the freight car facility I visited some 17 years ago is now a trainload facility for propane tank cars (it was raining too hard to stop for pics there). I did get to see an idle NHC Geep in Groveton, and see some repair work in place on the old Groveton Station.

New Hampshire Central GP9 7324 (ex-NYC) sits idle along the mainline next to the empty area that once housed the large paper mill at Groveton. No active railroad activity here in this rainy Monday.
 
Directly opposite the GP9, the Groveton station shows some recent repairs in place on the roof. St. Lawrence & Atlantic trackage between Maine and Montreal (ex-Grand Trunk) is situated behind the station, while the NHC (ex-B&M) track is to the right of the station (where the GP9 was parked). I'm not sure what the overall plan is for this area or the station.
In August we took a trip down to Baltimore Inner Harbor. Not much left of train activity in the area we were, but did see 2 older railroad relics while taking a ride on the Water Taxi.

This older building along the waterfront still shows faded "Railroad" lettering between the 2nd and 3rd floors.

This old pier still has rail in place, which can be seen overhanging the wooden structure. Trees in the background are actually growing on the pier itself, which is not accessible (or too safe looking) for people, let alone rail cars!
Our final stop takes us to Florida. We visited relatives over Labor Day weekend (before the hurricane). Although we flew down, we did leave by taking the Trip-Rail train from Delray Beach back to Fort Lauderdale airport. While waiting for the Trial-Rail train, the Amtrak train 98, the northbound Silver Meteor out of Miami made a station stop. I thought this was cool as I had just recently put a Seaboard Air line boxcar with Silver Meteor lettering onto the layout (see post).

The northbound Amtrak 98 Silver Meteor stops at Delray Beach while we waited on the next southbound Trip-Rail commuter train. The Amtrak train arrived right as we were getting on the platform, so this was the best shot I could get.
So that concludes my Summer report. I'll be back to work on the layout for an open house in November, as well as doing some module work for the NER Newport Convention in November and the Springfield show in January. I also want to get in another Op Session. So there will be more to report in the coming weeks.

Monday, March 06, 2017

Three Old Boxcars

A few years ago, while planning to do some airbrushing, I decided to plan ahead and paint a number of cars and locos even if I was not planning to work on them right away. I figured given the time spent setting up and airbrushing, followed by full cleanup, it would be best to maximize the units getting painted. As best as I can tell, that was over 6 years ago. Since then I have addressed a number of those projects, bit not all of them.

Part of the lot involved painting some undecorated Details West boxcars. These were the "yellow box" kits that included a few different 50' boxcar styles and included a more enhanced under frame than the standard Athearn "blue box" kits of the day. I've always liked these kits, and one of the things that really drove my early participation in model railroading was the desire to replicate cool 50' boxcars in the "Railbox" style as well as older outside sheathed cars like the DW models.

Recently I have been cleaning things up a bit and moving in progress projects to the recently acquired  IKEA drawer unit. and I came across 3 painted DW shells ready for decals and finishing. I decided to spend an evening dealing these cars while in the family room with my wife watching the Oscars on TV. Decaling is a pretty easy task to integrate into TV viewing,

I feel I have a lack of CONRAIL equipment in general on the layout, but it is really useful in conveying the time period as post 1976. This Champ decal set was in my collection for probably 40 years, so it is nice to finally see some usage. I was not going for 100% accuracy on this car number, but looking to capture the look of similar CR boxcars. I used quite a bit of chalk weathering on this car and I like the way it tones down the whites decals.

Another Champ decal set drove this car. I could not find much in the way of prototype pictures of 50' SAL boxcars and almost decided to skip this particular car, but I like the unusualness of an SAL car (in contrast to my overall roster) and the large logos. It probably is more appropriate for an older style car. I do plan to do a bit more with this car, repainting dimensional data and other things as you would see on an older car in the 1970s. For now it has a basic weathering coat done, but I will get more aggressive later.

Here is a prototype example that I plan to use to drive my additional weathering and detailing.

I had ordered a set of BAR boxcar decals from Highball Graphics in 2001(!). Since then some nice examples have been released in this scheme, but BAR cars were very prevalent so adding another still made sense. Again, not 100% accurate for the number series, but a good representation. This has black ends, and I added some basic weathering here as well, which again gave a nice effect to the lettering looking a bit faded.
It was fun doing these 3 cars and getting 3 projects off the back burner and ready for the rails. All 3 will probably see some more work, from weathering as I mentioned to replacing the stirrup steps on each corner.

Looking through my decals, I have probably a lot more things I planned to do that will probably not happen now. A lot of this has to do with the better quality freight cars that exist now versus when I actually acquired most of these decals. But there will always be that need for something different, and always a desire to go back and enjoy a simple paint and decal project.

Tuesday, February 21, 2017

Woodsville Terminal

In my last post I mentioned the Woodsville Terminal Railway Co. This was a fictional shortline created by Mike Confalone that he modeled before switching over to the Allagash (which has been covered very well by Model Railroad Hobbyist magazine in articles, e-Books and videos). The older WTRC was covered in Model Railroad Planning.

Decals were made for the Woodsville Terminal by Highball Graphics, part of their Freelance Railroads series. I picked up their set FL-1 for Woodsville Terminal boxcars as it offers a neat paint scheme that clearly identifies the location of the (fictional) railroad being in VT and NH.

Highball Graphics set FL-1
On my car I went with a more orangish color than what Mike and Neil Schofield used in the examples from the Highball Decals web site, This was so it would not blend in too easily with the large number of Maine Central cars I have.

WTRC 2601 looks real spiffy having just recently been placed into service. This is an Intermountain car I stripped the lettering off and repainted.
What is cool is the slogan actually mentions Northeast Kingdom. The font is similar but not the same as the Lamoille Valley. All in all a pretty neat looking car that looks right for my region and era.

I have some other WTRC equipment, purchased from Perkins Road Depot. These are wood chip hoppers with extended sides. These use custom decals otherwise not available.

I picked up this wood chip hopper from Dave of Perkins Road Depot while at the Springfield show this year. It joins 2 others purchased in the past, one black and one brown, 
In the past I have staged woodchip hoppers in Morrisville yard for the LVRC to deliver to the MEC and ultimately to the B&M for use at the Groveton paper mill. I assumed that the WTRC performed an interchange with the LVRC somewhere along the line and at the start of an op session, these hoppers were already in the yard.

Lately though I have been thinking about establishing a WTRC train to bring some cars into Morrisville during the session. I think it will add a neat little enhancement to the LVRC operations without too much of an impact. It will also give me the chance to look into some WTRC locomotive power, perhaps a re-lettered D&H unit, and maybe at some point an actual painted loco in the WTRC scheme, something I'm not sure Mike C. even had completed, but I'll have to find out.

Monday, January 23, 2017

Recent work, and Springfield!

A quick update on some things I have been working on. But also, this weekend, the big train show up in Springfield, Massachusetts will be happening, and I'll be on hand again with my Woodstown Junction Free-mo modules, setting up a big layout with the New England Free-mo guys. Hope to see you there!

I was able to get the 2 new turnouts situated in Morrisville in order to add the new run around. Of course one of them had the points centered directly under a subroadbed support, but luckily it was as simple as removing a couple screws to get the support out off the way. I'm glad I followed hat advice about drilling up into the subroadbed from below instead of down from above. A few pieces of track reconnected everything, and a few new feeders, and I was able to successfully test it out running a train back and forth. No Tortoise machines yet - that will have to wait until after the Springfield weekend.

All track is back in place, and the siding to Lamoille Grain company is ready to receive a few loaded grain cars. Next up will be adding the Tortoise machines and doing some testing before paint, ballast and scenery repairs.
A while back, over on Trevor Marshall's Port Rowan blog, Trevor wrote about rebuilding his workshop and using some Ikea furniture to build things out. I have used a few different Ikea products, including my workbench and chair, a couple of racks for paint bottles, as well as a metal cabinet that stores lots of supplies. Trevor made mention of an Ike drawer system called "Alex" and how someone he knows uses it for extra car storage (Trevor went with some different cabinet choices). I've started to suffer from having completed and in progress cars and locos in various places around the layout room, so I decided to investigate this as a solution. It turns out to be a great solution, and I was lucky enough to get an after holiday 15% off sale price too. These would work well for lots of different things, like styrene sheet and strip stock, but I'm glad to have the one just for my various rolling stock and locos.

The unit provides 5 shallow drawers (the 2 lower are a little deeper) that work great for holding rolling stock and locomotives. I did not try to max out the space, but it would seem easy to hold upwards of 100 pieces or more of rolling stock.

The whole unit is on casters too making it easy to roll out and around if needed. This storage freed up a number of other areas around and under the layout and nicely centralized everything related to cars and locos not currently on the layout, but already out of their manufacturer boxes.
One of the drawbacks of the way my staging yard came out is the limited visibility for operators to see their trains when they enter or exit the yard. It is not overly complicated or a long distance to travel, but almost all operators prefer to visually see their train at all times if possible.

I've often thought a mirror would help operators get a visual on their train, just to see that they are moving and at what speed. Turns out we had another Ikea item in storage, purchased many years ago, a simple 9 inch square mirror. I played around with one to see if it would work. What I like is that it is not a giant mirror but just enough to see the yard ladder when you stand in the right place. I think the operators will appreciate this addition.

I made a simple triangular shelf and an angled support for the mirror. I used just one screw on the support so I could make some minor adjustments. After it was up, I decided to add a front trim piece to give a better appearance to the shelf. This mirror handles the Maine Central track into Portland bound staging (Portland, Bartlett).

A second mirror is up at the CP/BM end of the staging yard.  This one was built the same way.
This picture demonstrates how standing in the proper location will provide a nice view of the staging yard, making it easy to see trains on the move.
I've been slowly progressing on the ET & HK Ide building. I completed adding the embossed paper to represent the metal panels, and completed the loading dock, overhang, and windows and doors. Up top the windows are covered over. In front of them will be the unloading chutes up to the conveyor. Two holes in the roof were added so these can pass through. Still plenty more to do, but getting there.

I decided to place the in progress structure in its proper spot on the layout between work sessions. As I do not have the road underpass (which would be where the CP Rail switcher is, over to the V&O boxcar), this structure is more representative than prototypically accurate. Still I am trying to capture as much of the look and feel as possible.
One final project, I installed a Soundtraxx SoundCar into a BAR boxcar. I really wanted to get this done before Springfield so I could take it up there to try it out.

All the components are installed, including the SoundCar module on the roof (so it can be operated with a magnet), a Current Keeper module to prevent sound drop outs, and a spare Railmaster speaker I had on hand that doesn't seem likely to fin fit into any of my locomotives. 
Initial playing around was pretty neat. The consist via magnet works great. I adjusted a few volume settings, so I look forward to running this on trains through Woodstown Junction and out on the big Free-mo mainline this weekend.

Tuesday, January 17, 2017

Maine Central 564 - Good and Bad

I wrapped up the majority of the work on my 1970s version of Maine Central EMD GP7 #564. This unit was painted in a simplified green scheme used on a few locomotives starting in the late 1960s. It contrasts nicely with the harvest gold units that comprised the bulk of the MEC locomotive fleet of the day.

MEC 564 leads a short ballast extra through the White Mountains of New Hampshire in 1973. NERAIL photo by Jim Wright. 

Ted Houghton's image from rrpicturearchives.net provides a well lit side view of 564.
My model uses an Atlas GP7. I actually painted and decaled it (Microscale) a few years ago, but it has sat waiting for completion as other projects took priority. I found a need to get another MEC loco on the layout, so I pulled this unit out for finishing.

Added details include the front hood mount bell, the side mounted air horn and a winterization hatch. There are a few other details I can add, including a speed recorder and the correct MU stands, bt not having these on hand, they will have to wait.

The Microscale set is not the best representation of this paint scheme however, as it is a little too yellowish, and it also lacks the ring around the Pine Tree herald.

MEC 564 idles in St. Johnsbury

One thing that stands out nice on this unit is the Harvest Gold painted pilots.

I used mainly powders for weathering providing a good covering of rust, dust and soot.
However, not all was good unfortunately. I previously posted a picture of this unit showing the iPhone 4 speaker situated above the Tsunami decoder. The sound is great and after a little programming and adjusting the EQ, it sounds really nice.

That is until it stops making sound, or starts playing random horn sounds. Seems something is not right with the decoder. I tried a factory reset, and get the same results. It runs fine for a while, but sooner or later the sound cuts out, or the whole decoder cuts out and the loco stops. It is possible I damaged something doing the install, although this would be the first bad install after a couple dozen.

So it seems the remedy will be to carefully pop the shell back off and replace the decoder. It is ashame as I had it nicely speed matched with the Atlas factory-painted Harvest Gold GP7 565 shown above. As this was the last of the sound decoders I had on hand, the question now will be whether to go to Tsunami 2, to LokSound, as I would like to give them a try. Guess I'll have something to pick up next weekend at the Springfield show!


Monday, January 02, 2017

Groveton NH Video

Happy New Year! Thanks to all those who take the time to check out my blog and see the latest on my layout. I enjoy putting information and pictures up here, and I hope it is useful and entertaining for most!

A week ago I used my iPhone to capture a few video clips of train action in Groveton NH. It doesn't encompass the full scope of operations that train 4301 performs, but I thought it would be neat to see some of the action up close as well as see the overall area and how it has progressed to date. I think it turned out to be a neat little operation within the overall scope of the layout.

While heading up to Boston on the Acela, I had fun editing the video and also adding some audio over top the video action. Using some audio clips from various sources as well as some of my own railfan video, I merged together a finished video which I think is more fun than just plain video. The Kato RS2, custom painted for BM #1501, does not have sound of its own at this point.

The video is up on YouTube, and you can view it below. If for some reason you can't see or play it, here is a direct link: https://youtu.be/MOeA7pdvf3Q

I would suggest viewing it larger than the small window below however. There is a Full Screen button at the lower right of the video.

I hope you enjoy!


Thursday, September 29, 2016

Track Cleaning and CRC 2-26

I should have a number of new posts coming up. Things have been busy as I got the layout cleaned up and staged for an Op Session, which went off last night (9/28). I did manage to take some pictures this time, so look for that post soon. I also have some updates on the Groveton scene and a FOS scale structure that was fun to assemble. But for this post I wanted to mention what some of the guys in South Jersey have been doing for cleaning track.

For years I have been using alcohol in a track cleaning car to prepare the rails for an op session or open house. And I'd take the locomotives through an alcohol wheel cleaning session using a paper towel and running the loco to spin the wheels over it. Time consuming, and usually good for mainly that one time. Things would deteriorate slowly depending on how soon I ran things again, and in some cases which locos were involved. Some locos just seemed to need another cleaning right away after a session.

A few layouts in the area have taken to an extra step following this cleaning, and that involves applying CRC 2-26 to the rails and the loco wheels after they are cleaned. The reports have been very encouraging. One layout did this task a year and a half ago and has not touched the rail or wheels at all. He operates every month, and there are no electrical contact issues. It seems the CRC 2-26 helps prevent the oxidation that occurs and assists in allowing the electrical contact to be made between the rail and wheel. I'm sure there's more science to it, but for me, I'm just looking for a solution!

Here is the can of CRC-26. It is a smaller can I picked up at Home Depot. Some guys have a larger can. In front is the Homasote block I use to apply to the rails. After a little time it gets thoroughly saturated.

So, I had 2 of the regulars from the local operating crew in South Jersey stop by to assist me in doing the same for my layout.

Step 1 was making sure the rails were clean. In general my track is not too bad and is mainly just in need of a light cleaning to remove surface oxidation. We used regular rubber pencil erasers for this, to remove any oxidation without scratching the metal surface. I also have aWoodland scenics track cleaning block, and the white side is similarly soft like an eraser. Around Groveton it took a little more work as I was recently doing scenery work there. Here I used the reverse side of the Woodland Scenics track cleaner to remove glue and paint that accumulated, then finished with the smoother white side of the cleaner to finish.

This is the Woodland Scenics track cleaning block, shown here using the softer polishing side. In this section of Groveton, I had a bit more work to remove scenery residue that was not an issue throughout the rest of the layout.

Step 2 was to next apply the CRC-26. The method employed by the guys in the area is to spray a small amount of CRC 2-26 onto a Homasote block and drag it back and forth over a section of rails to put a light coating on top. Doing it you can feel how the resistance changes and generates a kind of polished feel.

Using the Homasote block with CRC 2-26 applied, lightly spreading it by going back and forth, with no real pressure.

No need to apply pressure as you are just putting a thin coating over he rails. I was able to do about 10 feet of track and then applied a little more CRC 2-26 to the block, then repeating on the next section of track. Basically it is just a feel. As long as the block still has 2-26 on it, and as long as you hit all the rail, you should be good.

Step 3 was to let this dry without running, at least over night. When you check the rail out you will see it is not bright and shiny but has a slight yellow, dull look to it. Nothing that looks odd, just not the same as perfectly scrubbed nickel silver before running  on it. This apparently is the coating of CRC 2-26 doing its thing in preventing oxidation.

Step 4 was to address the locos. Basically I used paper towels and alcohol while the engine was running to clean the wheels, letting them spin on the paper towel until the black buildup came off and the towel looked clean when the wheels were moved to a different area.

Step 5 was to apply some CRC 2-26 to another piece of paper towel and repeat the running over the paper towel to get a thin coat onto the wheels. Then let the loco wheels dry to allow the CRC 2-26 to set.

Maine Central RS-2 554 is getting an initial wheel cleaning by running over this paper towel soaked with alcohol. It helps to hold the loco and let the wheels spin. Adjust the paper towel as you go to ensure the wheels run clean. A similar technique is then used to apply the CRC 2-26 to the wheels.
One extra step I did as I restaged the layout was to run each freight car over a paper towel with alcohol. This took a while, but was the first time I cleaned any freight car wheels, so it seemed the right way to go considering I had address all the track and all the locos. No need to spread any crud over the nice clean rails!

So the proof will be in how things run I suppose. the cleaning took place in early September. As I restaged the layout, I ran some locos around and down into staging tracks, back and forth. No issues whatsoever. At the Op Session last night, there was not one instance a contact issue related to rail to wheel contact. The few issues we did have were specifically no power on the points of a turnout, and a section of a siding that was dead due to a failed solder joint on the track feeder. These were noted and will be addressed.

Of course this is a short timeframe, so we'll see how things go. I'll be restaging the layout in the coming weeks, and will also have an open house and another Op Session in November. There will be no track cleaning taking place, so it will be a good test to see how things work. But based on the numerous other layouts that are working successfully from this method, I'm confident in seeing good results.

Thursday, May 05, 2016

TBT - 1980's Detail Parts

I was doing some cleaning up around the workbench and came across 2 items purchased a while ago to help with freight car detailing and modeling in the 1980's. Back then of course we did not have as many options with prototype specific freight cars and modifying existing kits was necessary to push towards more accurate models.

The first item addressed a need to duplicate what the real railroads have been doing over the past decade of the 1970's - removing roof walks from boxcars. Many older 40 and 50 foot boxcars had their ladders lowered and roof walks removed, so it was natural to model that as well if you were a "current" era modeler, which I was at the time.

But removing the roof walk of an Athearn boxcar left you with 4 rather large holes to fill in. Hence the introduction of "Roofwalk Plugs" by I believe CM Shops.

These 4 plugs fit nicely into the Athearn roof, and have a matching rib detail to help blend the roof.
Not a lot of use for these now as more accurate "modernized" 40' boxcars can be purchased in model form already without the roofwalk. Even some older models with roof walks have such small holes that plugging them is not a big deal. Not sure if you can even find this product any more, except buried deep in an older hobby shop perhaps.

Next up was a cool add on for hopper cars. It seems the capacity of some older cars with flat sides were increased with the addition of side panel extensions that protruded between the ribs, as shown here on this D&H model:


An older issue of Model Railroading had a cool picture of a Central Vermont hopper car with some of these panel extensions added, but not completely on every panel. It was a cool effect, and I know I wanted to model that.

To model that appearance, a company (maybe Tichy?) produced styrene panels that you could glue to the sides of existing Athearn rib side coal hoppers. Here a look at some of them I came across:

These parts fit in specific locations between the ribs of the coal hopper to duplicate the look of the D&H car shown above.
It was pretty neat coming across these older parts which really helped you create unique models that were otherwise unavailable. I doubt I'll be using these parts, although I believe in a box somewhere is the CV hopper replicating the look of the car that did not have all the panels. That would explain why I only came across some of the panels from the original detail part. So maybe I'll dig that out and finish it one day.

Monday, May 02, 2016

What's Up with Intermountain Trucks?

I can't imagine I'm the only one who has had this issue. I have some nice Intermountain cars that came ready-to-run. For some reason, and without any obvious cause, I have had a truck on more than one of these cars just fall apart. Looking closely I can see one of the truck side frames seems to have broken off from whatever helps hold the pin into the center section.

There does not appear to be any fix for this that I can figure out. Pressing the side frame back on does not hold it in place and gluing it is not really an option, and probably would cause tracking issues with half of the truck being rigid and the other half having some flexibility.

Anyone else have this issue and know what is going on?

A good truck still on the car, and this one where the side came of the center section. The pin on the side frame no longer holds the piece together.
I replaced the truck with another manufacturer.

Otherwise the trucks are great. Just until they disintegrate.